PT-H300
FAQs & Troubleshooting |

PT-H300
Date: 05/31/2013 ID: faqp00001475_005
How do I set tape margins and what features are they?
- Press the Label key to display the Label menu.
- Select "Margin" using the Up or Down arrow key, and then set the value by using the Left or Right arrow key.
- Press the OK or Enter key to apply the settings.
* New settings are NOT applied if you do not press the OK or Enter key.
| Full |  |
- Each label is printed, leaving a margin of 25 mm/0.98" on each end.
| Half |  |
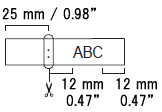
- A margin of 25 mm/0.98" is printed first, and then each label is printed, leaving a margin of 12 mm/0.47" before and after the text.
- Dots (:) are printed in front of the text. Cut along the printed dots (:) with scissors.
| Narrow |  |
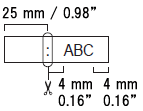
- A margin of 25 mm 0.98" is printed first, and then each label is printed, leaving a margin of 4 mm/0.16" before and after the text.
- Dots (:) are printed in front of the text. Cut along the printed dots (:) with scissors.
| Chain |  |
- Use this setting when printing several labels with minimum margins.
- Feed the tape before using the cutter.
Otherwise a part of the text may be cut off. Do not try to pull the tape since this may damage the tape cassette. - After pressing Print, "OK to Feed?" appears.
Press the Escape key to enter more texts or press the OK or Enter key to feed. - The final label is printed with an 9.5 mm/0.37" margin to the right of the characters. Use scissors to cut off any part of this margin that is not required.
PT-H300
If you need further assistance, please contact Brother customer service:
Content Feedback
To help us improve our support, please provide your feedback below.
Step 1: How does the information on this page help you?
Step 2: Are there any comments you would like to add?
Please note this form is used for feedback only.