PT-H300
FAQs & Troubleshooting |
How do I set tape margins and what features are they?
- Press the Label key to display the Label menu.
- Select "Margin" using the Up or Down arrow key, and then set the value by using the Left or Right arrow key.
- Press the OK or Enter key to apply the settings.
* New settings are NOT applied if you do not press the OK or Enter key.
| Full |  |
- Each label is printed, leaving a margin of 25 mm/0.98" on each end.
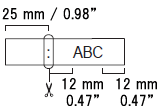
| Half |  |
- A margin of 25 mm/0.98" is printed first, and then each label is printed, leaving a margin of 12 mm/0.47" before and after the text.
- Dots (:) are printed in front of the text. Cut along the printed dots (:) with scissors.
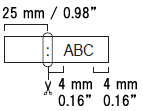
| Narrow |  |
- A margin of 25 mm 0.98" is printed first, and then each label is printed, leaving a margin of 4 mm/0.16" before and after the text.
- Dots (:) are printed in front of the text. Cut along the printed dots (:) with scissors.
| Chain |  |
- Use this setting when printing several labels with minimum margins.
- Feed the tape before using the cutter.
Otherwise a part of the text may be cut off. Do not try to pull the tape since this may damage the tape cassette. - After pressing Print, "OK to Feed?" appears.
Press the Escape key to enter more texts or press the OK or Enter key to feed. - The final label is printed with an 9.5 mm/0.37" margin to the right of the characters. Use scissors to cut off any part of this margin that is not required.
Content Feedback
To help us improve our support, please provide your feedback below.
