PE-DESIGN Ver.6
FAQs & Troubleshooting |
PE-DESIGN Ver.6
Date: 09/06/2016 ID: faqh00000100_000
I've written the pattern onto the original card and selected it on the sewing machine, but I can't change the sewing position.
Patterns created with the "Design Page area" setting turned on are sewn as they appear in the Design Page of Layout & Editing.
This means you don't have to worry about changing the sewing position on the sewing machine.
The sewing area can be specified.
-
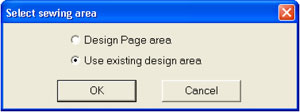
Click Sew, then Select Sewing Area.
The following dialog box appears.
-
Select the Use existing design area and click OK.

Design Page (on your screen)


Sewing area = Design Page area

Sewing area = Use existing design area
Patterns created with the "Use existing design area" setting turned on are sewn without regard to the pattern's position in the Design Page of Layout & Editing.
The pattern position will automatically be set in the middle of the embroidery frame.
You can change the sewing position of these patterns on the sewing machine as you like.
PE-DESIGN 8, PE-DESIGN Ver.5, PE-DESIGN Ver.6, PE-DESIGN Ver.7
If you need further assistance, please contact Brother customer service:
Content Feedback
Please note this form is used for feedback only.