Innov-is NS2750D
Preguntas frecuentes y solución de problemas |
Innov-is NS2750D
Fecha: 31/07/2023 ID: faqh00000638_003
How do I remove or attach the Embroidery foot ?
Be sure to use embroidery foot when doing embroidery. Using another presser foot may cause the needle to strike the presser foot, causing the needle to bend or break and possibly cause injury.
-
Press
 (Needle position button) to raise the needle.
 -
Press
 .
.
The screen changes, and all keys and operation buttons are locked (except).

-
Raise the presser foot lever.
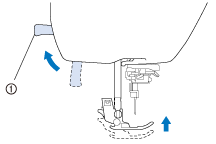
(1) Presser foot lever -
Press the black button on the presser foot holder to remove the presser foot.
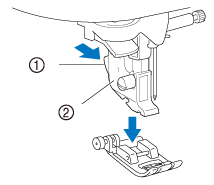
(1) Black button (2) Presser foot holder
-
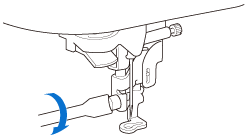
Use the included screwdriver to loosen the presser foot holder screw, and then remove the presser foot holder.
The presser foot holder screw can also be loosened or tightened with the disc-shaped screwdriver.
(1) Screwdriver (2) Presser foot holder
(3) Presser foot holder screw
-
Hold the embroidery foot with your right hand, as shown.
Hold the embroidery foot with your index finger wrapped around the lever at the back of the foot.
(1) Lever (2) Embroidery foot bar
-
While pressing in the lever with your finger fit the embroidery foot bar over the needle clamp screw and then fit the presser foot holder screw into the presser foot mounting notch to attach the embroidery foot to the presser foot bar.

(1) Embroidery foot bar
(2) Needle clamp screw
(3) Mounting notch
-
Secure the embroidery foot with the presser foot holder screw.
Set the embroidery foot perpendicular.
(1) Presser foot holder screw -
Hold the embroidery foot in place with your right hand, and then use the included screwdriver to securely tighten the presser foot holder screw.
-
Press
 to unlock all keys and buttons.
Si necesita asistencia, contáctese con el servicio al cliente de Brother:
Comentarios sobre el contenido
Para ayudarnos a mejorar el soporte, bríndenos sus comentarios a continuación.
Paso 1: ¿Cómo lo ayudó la información en esta página?
Paso 2: ¿Quiere agregar otros comentarios?
Observe que este formulario solo se utiliza para comentarios.