DCP-T820DW
Preguntas frecuentes y Solución de problemas |
DCP-T820DW
Fecha: 28/10/2020 ID: faq00100360_511
Check the Print Alignment from Your Brother Machine
If your printed text becomes blurred or images become faded after transporting the machine, adjust the print alignment.
DCP-T520W/DCP-T525W/DCP-T720DW/DCP-T725DW/DCP-T820DW/DCP-T825DW
- Press Menú (Menu).
- Press
 or
or  to make your selections:
 - Select [Maintenance]. Press OK.
- Select [ImproveQuality]. Press OK.
- Select [Alignment]. Press OK.
- Press Inicio Negro (Black Start) or Inicio Color (Color Start).The machine prints the Alignment Check Sheet.
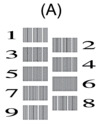
- For pattern (A), press or to select the number of the test print that has the fewest visible vertical stripes (1-9), and then press OK.
In the example above, row number 6 is the best choice.
Repeat this step for the rest of the patterns.

When the print alignment is not adjusted correctly, text looks blurry or crooked, like this:

After the print alignment is adjusted correctly, text looks like this:

- Press Detener/Salir (Stop/Exit).
MFC-T920DW/MFC-T925DW
- Press
 (Ink).
 - Press or to make your selections:
- Select [Impr. PrintQuality]. Press OK.
- Select [Alignment]. Press OK.
- Follow the LCD instructions.The machine prints the Alignment Check Sheet.
- For pattern (A), press
 or
or  to select the number of the test print that has the fewest visible vertical stripes (1-9), and then press OK.
 In the example above, row number 6 is the best choice.
Repeat this step for the rest of the patterns.
When the print alignment is not adjusted correctly, text looks blurry or crooked, like this:
After the print alignment is adjusted correctly, text looks like this:
- Press Detener/Salir (Stop/Exit).
DCP-T520W, DCP-T720DW, DCP-T820DW, MFC-T920DW, MFC-T925DW
Si necesita asistencia, contáctese con el servicio al cliente de Brother:
Comentarios sobre el contenido
Para ayudarnos a mejorar el soporte, bríndenos sus comentarios a continuación.
Paso 1: ¿Cómo lo ayudó la información en esta página?
Paso 2: ¿Quiere agregar otros comentarios?
Observe que este formulario solo se utiliza para comentarios.