Innov-is 4000D/4000
FAQ et Diagnostic |
Innov-is 4000D/4000
Date: 27/05/2016 ID: faqh00000432_000
Why is there an extra needle plate supplied with my machine?
The extra needle plate is the straight stitch needle plate.
The straight stitch needle plate and the straight stitch foot can only be used for straight stitches (middle needle position stitches).
Use the straight stitch needle plate and the straight stitch foot when sewing thin fabrics or when sewing small pieces which tend to sink into the hole of the regular needle plate during sewing.
The straight stitch foot is perfect to reduce puckering on lightweight fabrics.
The small opening on the foot provides support for the fabric as the needle travels through the fabric.
Always use the straight stitch foot in combination with the straight stitch needle plate.
-
Press the "Presser Foot Lifter" button to raise the presser foot and turn the main power to OFF.
-
Remove the flat bed attachment or the embroidery unit if either are attached.
-
Grasp both sides of the needle plate cover, and then slide it toward you.

(1) Needle plate cover
-
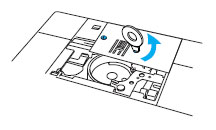
Grasp the bobbin case, and then pull it out.

(1) Bobbin case
-
Use the screwdriver included with the machine to unscrew and remove the regular needle plate.
-
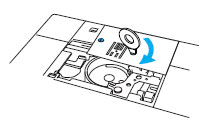
Set the straight stitch needle plate in place and use the screwdriver to tighten the plate.
-
Insert the bobbin case in its original position, and then attach the needle plate cover.
Align the two screw holes on the needle plate with the two holes on the machine and screws in the needle plate.
-
After reinstalling the needle plate cover, select any of the straight stitches.
When using the straight stitch needle plate, all straight stitches become middle needle position stitches.
You cannot change the needle position using the width display.
-
Selecting other stitches will cause an error message to be displayed.
- Be sure to turn the handwheel slowly in your direction before sewing and make sure that the needle is not contacting the straight stitch foot and straight stitch needle plate.
-
Selecting other stitches will cause an error message to be displayed.
-
Attach the straight stitch foot.
-
Start sewing.
* After sewing, make sure to remove the straight stitch needle plate and the straight stitch foot, and reinstall the regular needle plate, the needle plate cover and the presser foot "J".
To prevent puckering on fine fabrics, use a fine needle, size 75/11, and a short stitch length.
For heavier fabrics, use a heavier needle, size 90/14, and longer stitches.
Commentaires sur le contenu
Ce formulaire a pour seul but de nous faire part de vos commentaires.