HL-4570CDW
FAQ et Diagnostic |
HL-4570CDW
Date: 06/07/2010 ID: faq00000068_027
Install extra memory
Always turn off the machine power switch before installing or removing the SO-DIMM.
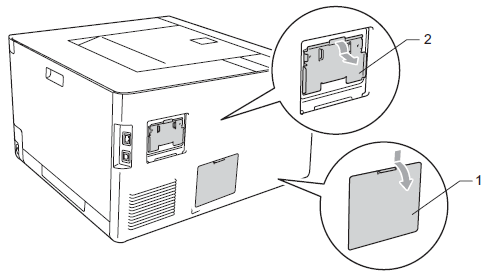
- Turn off the machine power switch, and then unplug the machine. Disconnect all interface cables from the machine.
- Remove the plastic(1) and then the metal(2) SO-DIMM covers.
- Unpack the SO-DIMM and hold it by its edges.
To prevent damage to the machine from static electricity, DO NOT touch the memory chips or the board surface.
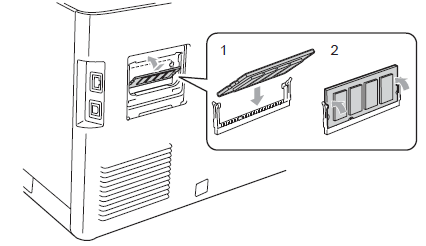
- Hold the SO-DIMM by the edges and align the notches in the SO-DIMM with the protrusions in the slot. Insert the SO-DIMM diagonally(1), then tilt it toward the interface board until it clicks into place(2).
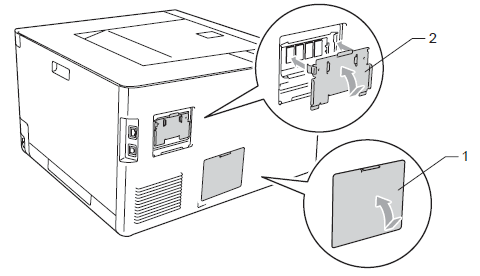
- Put the metal(2) and then the plastic(1) SO-DIMM covers back on.
- Reconnect the interface cable to your machine. Plug the machine back in, and then turn on the power switch.
To make sure that you have installed the SO-DIMM properly, you can print the printer settings page that shows the current memory size. To print the printer settings page, follow the steps below:
- Press + or - to choose Machine Info.. Press OK.
- Press + or - to choose Print Settings. Press OK.
FAQ connexes
HL-4140CN, HL-4150CDN, HL-4570CDW, HL-4570CDWT
Pour toute assistance supplémentaire, contactez le service clientèle de Brother:
Commentaires sur le contenu
Merci d'indiquer vos commentaires ci-dessous. Ils nous aideront à améliorer notre support.
Étape 1: Comment qualifieriez-vous les informations figurant sur cette page?
Étape 2: Y a-t-il des commentaires que vous voudriez ajouter?
Ce formulaire a pour seul but de nous faire part de vos commentaires.