HL-3450CN
Ofte stillede spørgsmål og fejlfinding |
HL-3450CN
Dato: 29-01-2014 Id: faq00002169_001
What is the Optional Hard Disk Drive (HD-6G/HD-EX) used for and how do I install it?
If you install an optional HDD, you can save macros, print log and fonts on it, and also select your print job and re-print it through the network.
Make sure that the box contains the following items.
- Hard disk
- Hard disk cables (2)
- Shoulder screws (4)
- Screws (4)
- Setup guide
The supplied longer cable is for other printers, do not use it for this printer model.
To install the Optional Hard Disk Drive\, follow the steps below;
-
Turn off the printer, and then unplug the power cord from the AC outlet.Disconnect the interface cable from the printer.
-
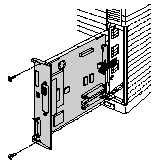
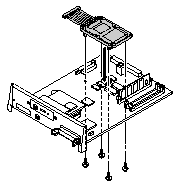
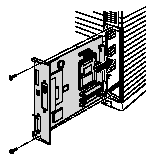
Unscrew the two screws securing the rear plate of the main controller board, and then pull out the main controller board.
-
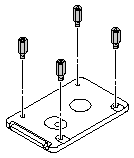
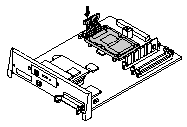
Insert the 4 shoulder screws supplied with the HD-6G/HD-EX unit into the bottom of the HD-6G/HD-EX.
-
Connect the shorter Hard disk cable to the HD-6G/HD-EX with the keyed side upwards, ensuring that it is correctly aligned.
-
Fit the 4 HD-6G/HD-EX shoulder screws into the 4 holes of the main controller board, and then secure the shoulder screws with the screws provided from the rear of the PCB.
-
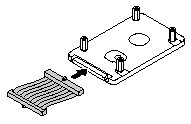
Connect the flat cable to the main controller board.
-
Install the main controller board into the printer by sliding it into the guide rails.
-
Secure the main controller board with the 2 screws.
-
Reconnect the interface cable to the printer. Plug the power cord into the AC outlet, and then turn on the printer.
-
Format the HD-6G/HD-EX from the control panel. See Chapter 4 for details.
Kontakt Brother Support, hvis du har brug for yderligere hjælp:
Feedback til indhold
Bemærk, at denne formular kun bruges til feedback.