Innov-is BP1430L
Perguntas frequentes e Solução de problemas |
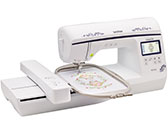
Innov-is BP1430L
Data: 09/08/2022 ID: faqh00000436_003
How do I wind the bobbin?
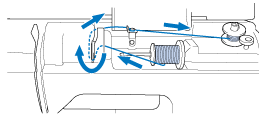
- Only use the bobbin (part code: SA156, SFB (XA5539-151)) designed specifically for this sewing machine. O uso de outra bobina pode fazer com que a linha fique emaranhada ou danificar a máquina.
-
A bobina inclusa foi projetada especificamente para esta máquina. Se forem usadas bobinas de outros modelos, a máquina não funcionará corretamente. Use somente as bobinas inclusas ou bobinas do mesmo tipo (código da peça: SA156, (SFB: XA5539-151)). Tamanho real SA156 is Class15 type bobbin.
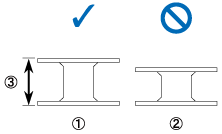
Este modelo
Outros modelos
11,5 mm (aprox. 7/16 polegada)
When winding bobbin for embroidery be sure to use the recommended bobbin thread for this machine.
-
Open the top cover.
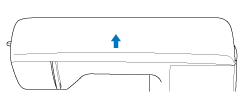
-
Place the bobbin on the bobbin winder shaft so that the spring on the shaft fits into the notch in the bobbin. Press down on the bobbin until it snaps into place.
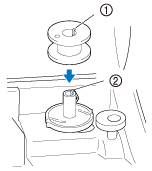
Canaleta
(2) Bobbin winder shaft spring
-
Slide the bobbin winder in the direction of the arrow until it snaps into place.
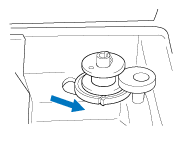
The "Start/Stop" button lights up in orange. -
Remove the spool cap that is inserted onto the spool pin.
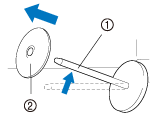
Porta-carretel
Tampa do carretel
-
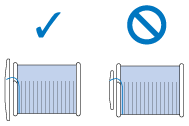
Place the spool of thread for the bobbin onto the spool pin.
Slide the spool onto the pin so that the spool is horizontal and the thread unwinds to the front at the bottom.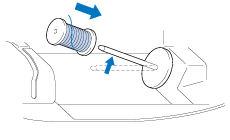
-
Slide the spool cap onto the spool pin.
Slide the spool cap as far as possible to the right, as shown, with the rounded side on the left.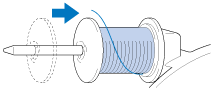
- If the spool or the spool cap is not installed correctly, the thread may become tangled around the spool pin, causing the needle to break.
-
Three spool cap sizes are available, allowing you to choose a spool cap that best fits the size of spool being used. If the spool cap is too small for the spool being used, the thread may catch on the slit in the spool or the machine may be damaged.
-
Ao costurar com linha fina de enrolamento cruzado, utilize a tampa pequena do carretel e deixe um pequeno espaço entre a tampa e o carretel.
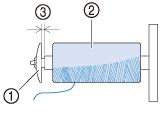
Tampa do carretel (pequena)
Carretel (linha de enrolamento cruzado)
Espaço
-
When using thread that winds off quickly, such as transparent nylon thread or metallic thread, place the spool net over the spool before placing the spool of thread onto the spool pin.
Se a redinha do carretel for muito comprida, dobre-a uma vez para ficar do tamanho do carretel antes de colocá-la sobre o mesmo.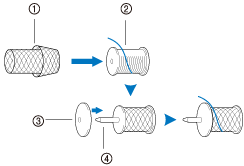
Redinha do carretel
(2) Spool
Tampa do carretel
Porta-carretel
-
Se um carretel de linha com centro de 12 mm (1/2 polegada) de diâmetro e 75 mm (3 polegadas) de altura for inserido no porta-carretel, use a tampa do carretel especial.
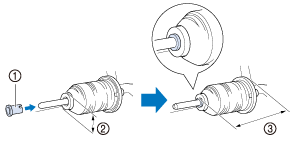
(1) Thread spool insert (mini king thread spool)
12 mm (1/2 polegada)
75 mm (3 polegadas)
-
While holding the thread near the spool with your right hand, as shown, pull the thread with your left hand, and then pass the thread behind the thread guide cover and to the front.
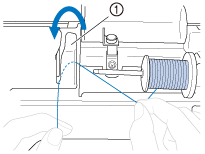
Guia da linha
-
Pass the thread under the thread guide plate, and then pull it to the right.
Placa da guia da linha
-
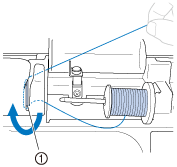
Pass the thread under the hook on the thread guide, and then wind it counterclockwise under the pretension disk.
Guia da linha
(2) Pretension disk
Puxe-a o máximo possível.
Assegure-se de que a linha passe sob o disco de pré-tensão.
-
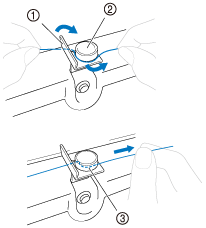
While holding the thread with your left hand, wind the thread that was pulled out clockwise around the bobbin five or six times with your right hand.
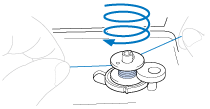
- Make sure that the thread between the spool and the bobbin is pulled tight.
- Be sure to wind the thread clockwise around the bobbin, otherwise the thread will become wrapped around the bobbin winder shaft.
-
Passe a ponta da linha pela abertura da guia na base do enrolador de bobina e puxe a linha para a direita para cortá-la com o cortador.
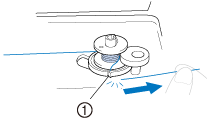
(1) Guide slit in bobbin winder seat
Abertura da guia (com cortador)Be sure to cut the thread as described.
If the bobbin is wound without cutting the thread using the cutter built into the slit in the bobbin winder seat, the thread may become tangled in the bobbin and the needle may bend or break when the bobbin thread starts to run out.
-
Ligue a máquina.
-
Pressione o botão “Iniciar/Parar” para iniciar o bordado.
Botão Iniciar/Parar
-
Pressione o botão “Iniciar/Parar” para parar a máquina.When the bobbin winding becomes slow, stop the machine, otherwise the machine may be damaged.
-
Use scissors to cut the end of the thread wound around the bobbin.
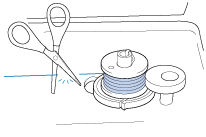
-
Slide the bobbin winder shaft to the left, and then remove the bobbin from the shaft.
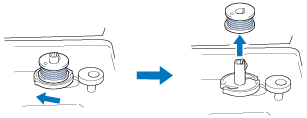 If the bobbin winder shaft is set to the right side, the needle will not move. (Sewing is impossible.)
 -
Remove the spool for the bobbin thread from the spool pin.When the machine is started or the handwheel is turned after winding the bobbin, the machine will make a clicking sound; this is not a malfunction.
Perguntas frequentes relacionadas
Innov-is BP1430L, Innov-is BP1530L, Innov-is NQ1400E
Se você precisar de assistência adicional, entre em contato com o atendimento ao cliente da Brother:
Comentários sobre o conteúdo
Note que este formulário é utilizado apenas para comentários.