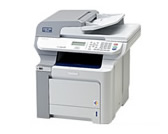
DCP-9045CDN
Perguntas frequentes e Solução de problemas |

DCP-9045CDN
Data: 30/03/2007 ID: faq00000095_024
How do I install the Optional Tray Unit?
Follow the procedure below.
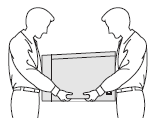
This machine is heavy. To prevent injuries use at least two people to lift the machine. Be careful not to pinch your fingers when you set the machine down.

- Turn off the power switch. Unplug the telephone line cord (for MFC users) and interface cable, and then unplug the power cord from the AC outlet.
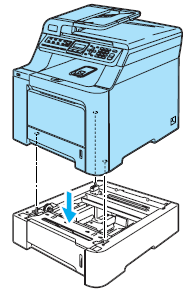
- Using two people, lift the machine carefully and place it onto the optional lower tray unit, so that the alignment pins of the lower tray unit are inserted into the guide holes on the bottom of the machine as shown.

- Plug the AC power cord into an AC outlet. Reconnect all cables and the telephone line cord (for MFC users). Turn on the machine's power switch.
- To set the paper size for the lower tray, press Menu => General Setup => Paper Size => Tray#2. Press the Up or Down Arrow key to select the paper size. Press OK, and then press Stop/Exit.
- For Windows users:
Windows 2000 users:
Click Start => Settings => Printers.
Windows XP users:
Click Start => Printers and Faxes.
Windows Vista™ users:
Click Start => Control Panel => Hardware and Sound => Printers.
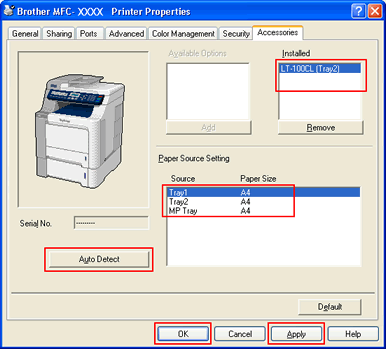
Right-click on your printer icon and choose Properties. Choose the Accessories tab and click Auto Detect. When the optional lower tray and paper size have been detected click Apply.
The Auto Detect function is not available under the following machine conditions:
- The machine power switch is off.
- The machine is in an error state.
- The machine is in a network shared environment.
- The cable is not connected to the machine correctly.
If this situation occurs, you can manually add the options you have installed. In Available Options select the option you have installed, click Add, and then click Apply.

For Macintosh users:
The printer driver is already configured for use with the lower paper tray. No additional steps are required.
Se você precisar de assistência adicional, entre em contato com o atendimento ao cliente da Brother:
Comentários sobre o conteúdo
Para ajudar-nos a melhorar nosso suporte, forneça seus comentários abaixo.
Passo 1: quanto as informações nesta página auxiliaram você?
Passo 2: Vvocê gostaria de acrescentar algum comentário?
Note que este formulário é utilizado apenas para comentários.