PR1050X
常見問題&故障排除 |
How do I specify the starting position or the ending position of embroidering?
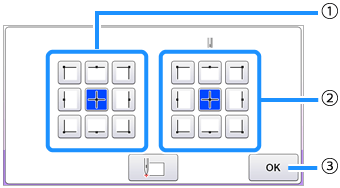
The machine can set the start point and the ending point separately from the 9 points of the pattern.
Those are upper-left corner, upper-center, upper-right corner, center-left, center-center, center-right, lower-left corner, lower-center and lower-right corner.
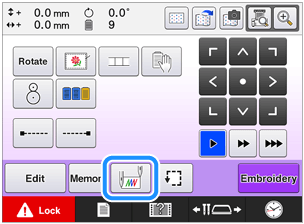
The starting/ending position settings are specified from the embroidering settings screen.
When the embroidery machine is purchased, both the starting position and the ending positions are set to the center of the pattern.
Displaying the starting/ending position settings screen
Touch ![]() .
.

→ The starting/ending position settings screen appears.

(1) Specifies the starting position
(2) Specifies the ending position
The highlighted key shows the currently selected setting.
Touch ![]() to close this screen.
to close this screen.
Specifying the starting position
Touch the key for the desired starting position setting.
When a starting position is selected, the ending position is automatically set to the same position.
→ The embroidery frame moves to the starting position.
Specifying the ending position
Touch the key for the desired ending position setting.
After selecting the desired settings, touch ![]() .
.
→ The embroidering settings screen appears again.
The starting/ending position settings do not change until the key for a new setting is touched. The settings specified before the machine is turned off remain selected the next time that the machine is turned on.
