HL-4000CN
FAQs & Troubleshooting |
Selecting the best possible print quality from a Windows PC
When printing from a PC system you can alter the print quality to suit your particular printing requirements. By altering this print quality, you can improve or reduce the level of print quality. By altering print quality settings, you can enhance the performance of the printer.
- Click here if you are using the PCL driver.
- Click here if you are using the PS(Post Script) driver.
- Click here if you don't know which driver you are using.
- Click here if you are using a Macintosh computer.
Using the PCL Driver
From a Windows applications such as Microsoft® Word, click the "File" menu, and then select the "Print" option. You will see a dialogue similar to the one below:
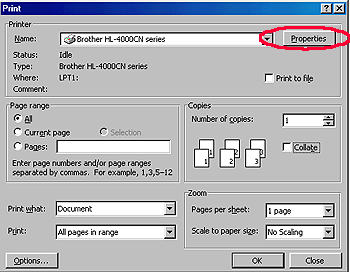
- Check the "Properties" button to display the printer driver setting.
-
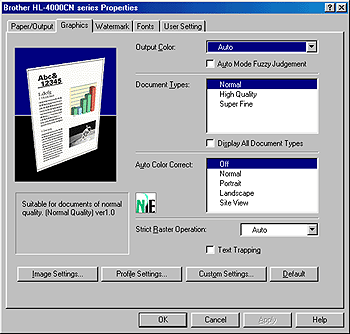
Click the "Graphics" Tab to display the following:
-
Note that there are three options:
- Normal (600×600 dpi)
- High Quality (600×600 dpi)
- Super Fine (1200×1200 dpi)
Normal (600 x 600 dpi)
This is the default print quality setting. When this setting is selected, the printer will print documents in 600 x 600 dpi (dots per inch). This mode ensures the fastest possible print speed in a good print quality. We recommend this option if you are generally printing text documents with occasional graphics.
High Quality (600 x 600 dpi)
This mode offers the good image print quality, however, print speed will be reduced compare to the Normal mode as the printer must perform additional calculations to improve the print quality of the images. However, if you generally print text, then we recommend the Normal option as print speed is faster.
Super Fine (1200 x 1200 dpi)
This mode offers the best possible print quality, however, print speed will be reduced as the printer must perform additional calculations to improve the print quality. We recommend this setting if you wish to ensure the best possible graphics, photos and fine line images print quality. However, if you generally print text, then we recommend the Normal 600 x 600 dpi option.
Using the PS (PostScript) Driver
From a Windows applications such as Microsoft® Word, click the "File" menu, and then select the "Print" option. You will see a dialogue similar to the one below:
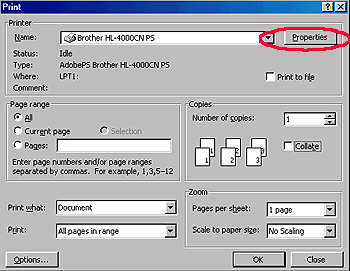
- Check the "Properties" button to display the printer driver setting.
(Windows NT 4.0 / 2000)
- Click the "Advanced" button.
-
In the "Printer Features" option select the "Document Types" option and select either Normal (600 x 600 dpi) or Super Fine(1200 x 1200 dpi)
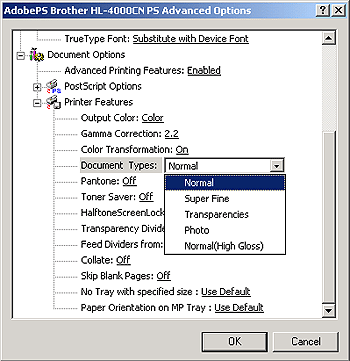
(Windows 95 / 98 / Me)
- Click the "Advanced" button.
-
In the "Printer Features" option select the "Document & Types" option and select either Normal (600 x 600 dpi) or Super Fine (1200 x 1200 dpi)

