PS5234
FAQs & Troubleshooting |
How to set the thread change assembly (Two-thread sewing)
Be sure to set the thread change assembly to the machine after completing the needle threading using the needle threader.
(You cannot use the needle threader with the thread change assembly set to the machine.)
- Turn off the machine for safety.
- Turn the hand wheel so that the mark on the hand wheel is aligned to the
 mark on the machine.
![Turn the hand wheel so that the mark on the hand wheel is aligned to the [TC] mark on the machine.](/g/b/img/faqend/faqh00000590_000/us/en/27619/4234_590_fig007.jpg)
- Hold the thread change assembly (
 ) with your fingertips tightly so that the gap is closed as shown below.
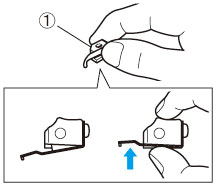
- While holding the thread change assembly (
 ), push the hole of the thread change assembly onto the upper end of the OL shaft (
  ) so that the OL shaft passes through the hole.

- Push the thread change assembly (
 ) fully downward until the tip (
 ) of the thread change assembly is put in the eye of the upper looper (
 ).
).
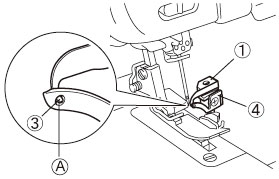
 Make sure that the tip is in the eye of the upper looper.
- Setting of the looper has finished.
Content Feedback
To help us improve our support, please provide your feedback below.