Innov-is 35P
SSS ve Sorun Giderme |
Upper thread tightened up
Symptom
- The upper thread appears as a single continuous line.
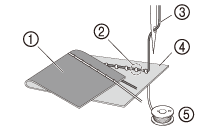
- The lower thread is visible from the upper side of the fabric. (Refer to the illustration below.)
- The upper thread has tightened up, and comes out when pulled.
- The upper thread has tightened up, and wrinkles appear in the fabric.
- The upper thread tension is tight, and the results do not change even after the thread tension is adjusted.
|
|
(1) Lower side of fabric (2) Lower thread visible from upper side of fabric (3) Upper thread (4) Upper side of fabric (5) Lower thread |
Cause
If the lower thread is incorrectly threaded, instead of the appropriate tension being applied to the lower thread, it is pulled through the fabric when the upper thread is pulled up. For this reason, the thread is visible from the upper side of the fabric.
Remedy/check details
Correctly install the lower thread according to the following procedure.
-
Turn off the sewing machine.
-
Remove the bobbin from the bobbin case.
-
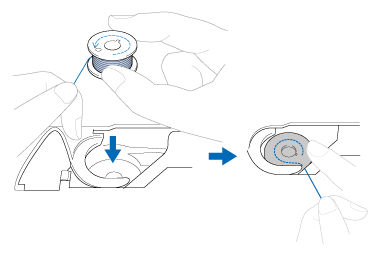
Place the bobbin in the bobbin case so that the thread unwinds in the correct direction.
Hold the bobbin with your right hand with the thread unwinding to the left, and hold the end of the thread with your left hand.
Then, with your right hand, place the bobbin in the bobbin case.
-
Lightly hold down the bobbin with your right hand (A), and then guide the end of the thread around the tab of the needle plate cover with your left hand (B).
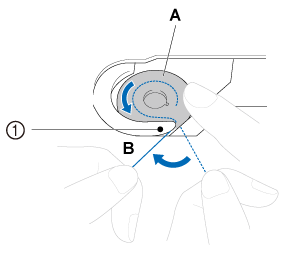
(1) Tab Be sure to hold down the bobbin with your finger and unwind the bobbin thread correctly, otherwise the thread may break or the thread tension will be incorrect.
-
While lightly holding down the bobbin with your right hand (A), guide the thread through the slit in the needle plate cover (B) and lightly pull it with your left hand (C).

-
While lightly holding down the bobbin with your right hand (A), continue guiding the thread through the slit with your left hand (B) Then, cut the thread with the cutter (C).
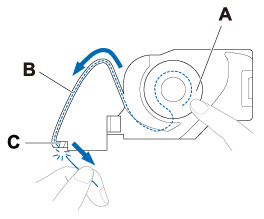
If the thread is not correctly inserted through the tension-adjusting spring of the bobbin case, it may cause incorrect thread tension.
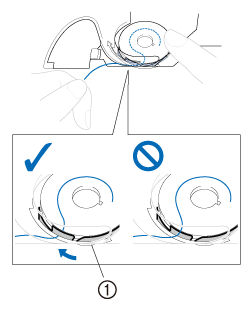
(1) Tension-adjusting spring -
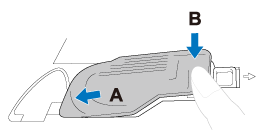
Replace the bobbin cover. Put the left tab in place (see arrow A), and then press lightly on the right side (see arrow B) until the cover clicks into place.
