RJ-4030
Întrebări frecvente şi depanare |
The print result is blurred/white lines appear on my prints, or the print result is too dark to read and sometimes the paper cannot be fed correctly. What should I do?
This problem can be caused if the Energy Rank or Print Density settings are not correctly adjusted for the type of paper you are using. Please choose one of the following to resolve the issue.
> Setting the suitable Energy Rank for your paper
> Adjusting the print density setting
Setting the suitable Energy Rank for your paper
Before using the RJ Utility
- Connect the printer to an AC or DC power outlet, or make sure that the battery is fully-charged.
- Make sure that the printer driver has been installed and is functional.
- Connect the printer to a computer via USB or Bluetooth® (RJ-4030 only).
- Connect the printer to be configured to the computer via USB.
-
Start the Printer Setting Tool.
Refer to "How to use the RJ Utility (for Windows)". -
The Printer Setting Tool screen is displayed.
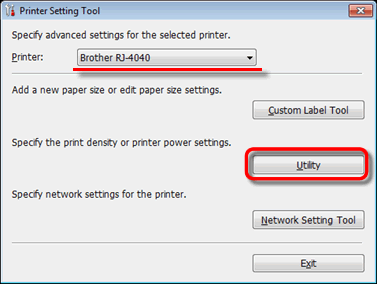
Select the printer connected in step 1 and click the [Custom Label Tool] button to open the Paper Size Setup dialog box.

-
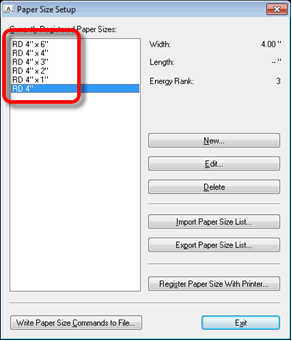
The Paper Size Setup dialog box is displayed. In the [Currently Registered Paper Sizes] field, select the paper size you want to edit.
-
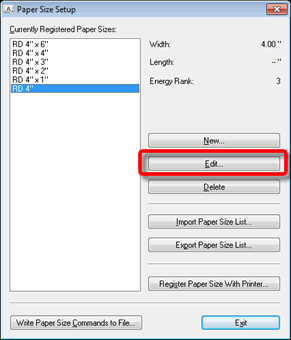
Click [Edit].
-
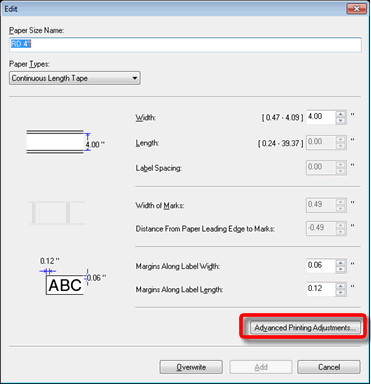
Click [Advanced Printing Adjustments...]
-
Adjust the print density value in the [Energy Rank] pull-down menu until you reach the desired result.
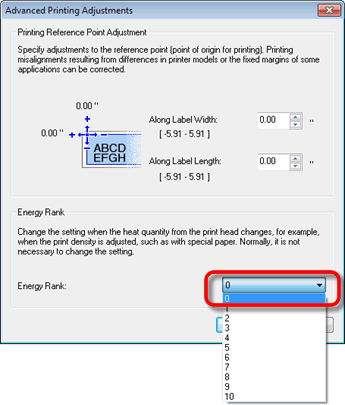
- Click [OK] to finish.
Adjusting the print density setting
Before using the RJ Utility
- Connect the printer to an AC or DC power outlet, or make sure that the battery is fully-charged.
- Make sure that the printer driver has been installed and is functional.
- Connect the printer to a computer via USB or Bluetooth (RJ-4030 only).
- Connect the printer to be configured to the computer.
-
Start the Printer Setting Tool.
Refer to "How to use the RJ Utility (for Windows)". -
The Printer Setting Tool screen is displayed.
Select the printer connected in step 1 and click the [Utility] button.
-
The main window is displayed.
Check the [Print Density] check box and select the desired settings from the pull-down menu.
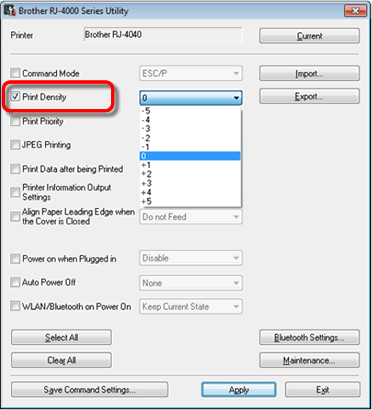
- Click [Apply] to save the settings in the printer, and then click [Exit] to close the window.
Dacă nu aţi primit răspuns la întrebarea dumneavoastră, aţi verificat celelalte întrebări frecvente?
Dacă aveţi nevoie de asistenţă suplimentară, vă rugăm să contactaţi serviciul de asistenţă clienţi Brother:
Spuneţi-vă părerea despre conţinutul furnizat
Pentru a ne ajuta să îmbunătăţim serviciile de asistenţă, vă rugăm să vă spuneţi părerea.