DCP-J925DW
Odpowiedzi na często zadawane pytania i rozwiązywanie problemów
The message "Disc Jam" is displayed on my Brother machine.
Follow the steps below depending on the error message the LCD shows.
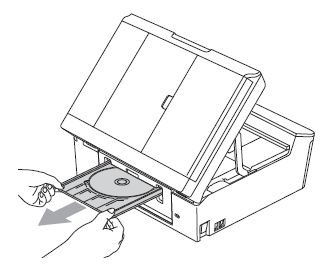
Case1: The LCD shows "Disc Jam [Front]" The disc jammed while printing. The Disc Tray was automatically ejected from the front of the machine.Remove the Disc Tray from the Disc Guide.
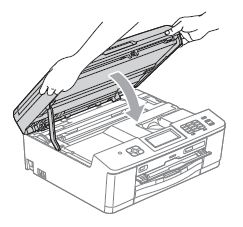
Click here to see Disc Tray is jammed at the front of the machine. Case2: The LCD shows "Disc Jam [Rear]" The disc jammed while printing. Make sure there is enough space behind the machine. Lift the scanner cover. Gently push the Disc Tray toward the back of the machine and remove the Disc Tray.
Click here to see Disc Tray is jammed at the back of the machine. Case3: The LCD shows "Disc Tray hits at the back" Cause 1:
There is not enough space behind the machine for the Disc Tray to feed. The Disc Tray was automatically ejected from the front of the machine. Remove the Disc Tray from the Disc Guide.
Click here to see Disc Tray is jammed at the front of the machine. Cause 2:
The Disc Tray is stuck inside the back of the machine. Make sure there is enough space behind the machine. Lift the scanner cover. Gently push the Disc Tray toward the back of the machine and remove the Disc Tray.
Click here to see Disc Tray is jammed at the back of the machine. Disc Tray is jammed at the front of the machine
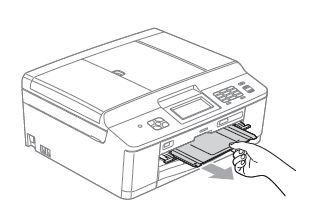
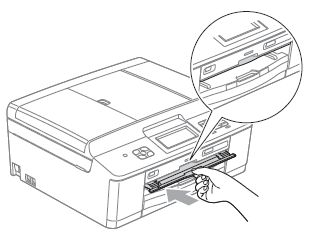
Unplug the machine from the AC power outlet (electrical socket). Remove the Disc Tray from the Disc Guide. Close the Disc Guide. Re-connect the power cord. Disc Tray is jammed at the back of the machine
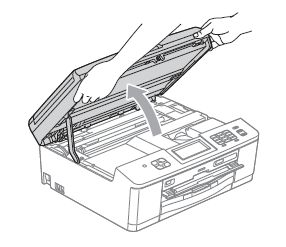
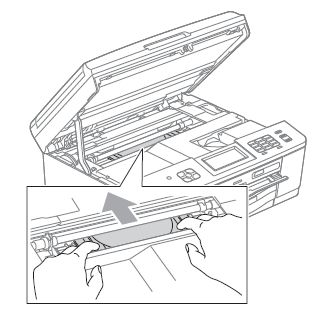
Unplug the machine from the AC power outlet (electrical socket). Make sure there is enough space behind the machine for removing the Disc Tray. Using both hands, grasp the plastic tabs on both sides of the machine and lift the scanner cover to the open position. Gently push the Disc Tray toward the back of the machine. Remove the Disc Tray from the back of the machine. Using both hands, grasp the plastic tabs on both sides of the machine and gently close the scanner cover. Close the Disc Guide. Re-connect the power cord.
Jeśli Twoje pytanie pozostaje bez odpowiedzi, czy sprawdziłaś/sprawdziłeś inne odpowiedzi na często zadawane pytania?
Czy zapoznałaś/zapoznałeś się z podręcznikami?
Jeśli potrzebujesz dalszej pomocy, skontaktuj się z działem obsługi klienta firmy Brother:
Opinie dotyczące treści
Aby pomóc nam udoskonalać naszą pomoc techniczną, przekaż poniżej swoją opinię.
Komunikaty o błędach Podawanie papieru / zacięcie papieru Drukowanie Skanowanie Kopiowanie Mobilne Chmura Inne Advanced Functions (for Administrators) Linux Konfiguracja urządzenia Sterownik / oprogramowanie Ustawienia sieciowe Materiały eksploatacyjne / papier / akcesoria Czyszczenie Specyfikacja Informacje dotyczące obsługiwanych systemów operacyjnych Filmy wideo z odpowiedziami na często zadawane pytania
Drukarka Scanner / Scan Key Tool Security Enhancement Komunikat o błędzie na wyświetlaczu urządzenia Komunikat o błędzie na monitorze stanu Komunikat o błędzie na ekranie komputera Komunikat o błędzie w urządzeniu mobilnym Zacięcie papieru Problem z podawaniem papieru Ładowanie / obsługa papieru Nie można drukować (przez sieć) Nie można drukować (przez port USB / równoległy) Nie można drukować (przez urządzenie mobilne) Problem z jakością druku Problem związany z drukowaniem bezpośrednim Ogólny problem związany z drukowaniem Drukowanie z komputera (Windows) Drukowanie z komputera (Macintosh) Drukowanie z urządzenia mobilnego Drukowanie bezpośrednio z urządzenia Ustawienia drukowania / zarządzanie Wskazówki dotyczące drukowania Nie można skanować (przez sieć) Nie można skanować (przez port USB / równoległy) Nie można skanować (przez urządzenie mobilne) Problem z jakością skanowania Ogólny problem związany ze skanowaniem Skanowanie z urządzenia Skanowanie z urządzenia mobilnego Skanowanie z komputera (Windows) Skanowanie z komputera (Macintosh) Ustawienia skanowania / zarządzanie Wskazówki dotyczące skanowania Nie można kopiować Problem z jakością kopiowania Ogólny problem związany z kopiowaniem Obsługa kopiowania Zaawansowane operacje sieciowe Problemy z konfiguracją sieci przewodowej Problemy z konfiguracją sieci bezprzewodowej Ustawienia sieci przewodowej Ustawienia sieci bezprzewodowej Wskazówki dotyczące ustawień sieciowych Problem związany z urządzeniem iOS Brother iPrint&Scan / Mobile Connect (iOS) AirPrint (iOS) Problem związany z urządzeniem Android™ Brother iPrint&Scan / Mobile Connect (Android™) Brother Image Viewer (urządzenie Android™) Problem związany z urządzeniem Windows Phone Brother iPrint&Scan (urządzenie Windows Phone) Problem związany z funkcją Usług internetowych Brother Usługi internetowe Brother Problem z urządzeniem Konfiguracja / ustawienia urządzenia Obsługa papieru Instalowanie sterowników / oprogramowania Odinstalowywanie sterowników / oprogramowania Ustawienia sterownika / oprogramowania Porady dotyczące sterownika / oprogramowania Materiały eksploatacyjne Papier Czyszczenie Specyfikacje urządzenia Obsługa systemu Windows Obsługa komputerów Macintosh Filmy wideo z samouczkami