DCP-8070D
Vanlige spørsmål og feilsøking |
The left side of the document will not print when I make a copy from the scanner glass.
This issue may be caused by incorrect settings.
Please try the steps below to solve the issue.
- Check if the paper you want to use for printing copies is in the paper tray you are printing from.
You can use MP Tray, Tray 1 or Tray 2*.
* The availability of Tray 2 varies depending on your model.
- Check if the appropriate paper size for the paper tray you are printing from (MP Tray, Tray 1 or Tray 2*) is chosen in the Paper Size setting.
* The availability of Tray 2 varies depending on your model.
- On the control panel of the machine, press MENU and choose General Setup => Paper => Paper Size.
- Press OK.
- Press the UP OR DOWN ARROW key to choose the paper tray you are printing from.
You can choose MP Tray, Tray#1 or Tray#2**.
** Tray#2 appears only if the optional tray is available and installed to your machine. - Press OK.
- Press the UP OR DOWN ARROW key to choose the paper size for the paper tray you are printing from.
You can choose A4, Letter, Legal*3, Executive, A5 L, A6, B5, B6, Folio***.
*** The availability of different paper sizes varies depending on the region and country. - Press OK.
- Press STOP/EXIT.
- Check if the paper tray you are using is chosen in Tray Use setting.
- On the control panel of the machine, press MENU and choose General Setup => Tray Use => Copy.
- Press OK.
- Press the UP OR DOWN ARROW key to choose the paper tray you are using.
You can choose MP Only, Tray#1 Only or Tray#2 Only*±.
*± Tray#2 appears only if the optional tray is available and installed to your machine. - Press OK.
- Press STOP/EXIT.
- Do one of the following:
- If you are making a reduced or enlarged size copy from the scanner glass, go to STEP 4.
- If you are making a regular size copy from the scanner glass, go to STEP 5.
- Check if the setting for a reduced or enlarged size copy is set properly.
For models with FAX functions:
- On the control panel of the machine, press COPY.
- On the control panel of the machine, press ENLARGE/ REDUCE.
- Press the UP OR DOWN ARROW key to choose the reduction or increase ratio.
- Press OK.
If you choose Custom (25-400%), enter the reduction ratio by using the dial pad. Press OK.
E.g. To enter 80%, press 8 0.
For models without FAX functions:
- On the control panel, press ENLARGE/ REDUCE.
- Press the UP OR DOWN ARROW key to choose the reduction or increase ratio.
- Press OK.
If you choose Custom (25-400%), enter the reduction ratio by using the dial pad. Press OK.
E.g. To enter 80%, press 8 0.
- Make another copy.
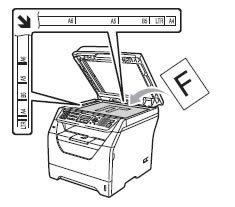
- Lift the document cover.
- Using the document guidelines on the left and top, place the document in the upper left hand corner with the document face down on the scanner glass.
NOTE: Illustrations shown below are from a representative product and may differ from your Brother machine.

- Close the document cover.
- Use the dial pad or numeric key to enter the number of copies (up to 99).
- Press START.
Tilbakemelding om innhold
Du kan hjelpe oss å forbedre kundestøtten vår ved å gi tilbakemelding nedenfor.
