Innov-is XP1
FAQ e Risoluzione dei problemi |
Upper thread tightened up
Symptom
- The upper thread appears as a single continuous line.
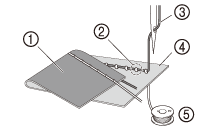
- The lower thread is visible from the upper side of the fabric. (Refer to the illustration below.)
- The upper thread has tightened up, and comes out when pulled.
- The upper thread has tightened up, and wrinkles appear in the fabric.
- The upper thread tension is tight, and the results do not change even after the thread tension is adjusted.
|
|
(1) Lower side of fabric (2) Lower thread visible from upper side of fabric (3) Upper thread (4) Upper side of fabric (5) Lower thread |
Cause
Incorrect lower threading
If the lower thread is incorrectly threaded, instead of the appropriate tension being applied to the lower thread, it is pulled through the fabric when the upper thread is pulled up. For this reason, the thread is visible from the upper side of the fabric.
Remedy
Correctly install the lower thread.
-
Use a bobbin thread that has been correctly wound. Otherwise, the needle may break or the thread tension will be incorrect.
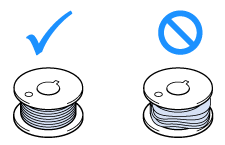
- The included bobbin was designed specifically for this machine. If bobbins from other models are used, the machine will not operate correctly. Use only the included bobbin or bobbins of the same type (part code: SA156, (SFB: XA5539-151 / 115J05E0001)). SA156 is Class 15 type bobbin.
-
Before inserting or changing the bobbin, be sure to press
 in the LCD to lock all keys and buttons, otherwise injuries may occur if the [Start/Stop] button or any other button is pressed and the machine starts sewing.
-
Press
 to lock all keys and buttons and raise the presser foot.
If the message OK to automatically lower the presser foot? appears on the LCD screen, press [OK] to continue.
-
Slide the bobbin cover latch to the right.
>> The bobbin cover opens.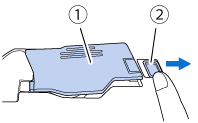
(1) Bobbin cover
(2) Latch
-
Remove the bobbin cover.
-
Hold the bobbin with your right hand and hold the end of the thread with your left hand.
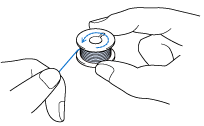
-
Set the bobbin in the bobbin case so that the thread unwinds to the left.
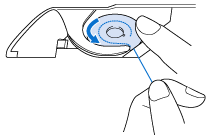
-
Hold the bobbin lightly with your right hand, and then guide the thread with your left hand.
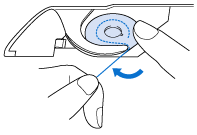
-
Pass the thread through the guide, and then pull the thread out toward the front.
>> The cutter cuts the thread.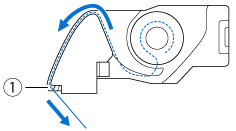
(1) Cutter Be sure to hold down the bobbin with your finger and unwind the bobbin thread correctly. Otherwise, the thread may break or the thread tension will be incorrect.
-
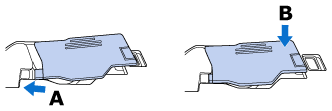
Insert the tab in the lower-left corner of the bobbin cover (A), and then lightly press down on the right side to close the cover (B).
-
Press
 to unlock all keys and buttons.
