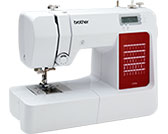
CS10s

FAQ et Diagnostic

FAQ et Diagnostic

Outline of viewing the LCD Screen

When the machine is turned on, the LCD will light up and the following screen is displayed.
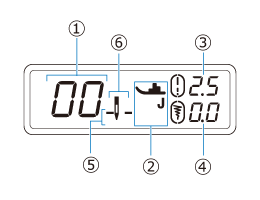
img

No. Item Name Explanation
(1) Stitch number Shows the number of the currently selected stitch pattern.
(2) Presser foot

Shows the symbol for the presser foot to be used. Before sewing, attach one of the presser feet shown here.

img : Zigzag foot "J"
img : Buttonhole foot "A"
img : Overcasting foot "G"
img : Blind stitch foot "R"
img : Monogramming foot "N"


* The symbols for certain presser feet, such as zipper foot "I" and the quilting foot, may not appear in the screen.

(3) Stitch length

Shows the stitch length of the currently selected stitch pattern.

When img is displayed around img , the stitch length is set to the default value.

(4) Stitch width

Shows the stitch width of the currently selected stitch pattern.

When img is displayed around img , the stitch width is set to the default value.

(5) Needle stop position

Shows whether the needle stop position is set to the lowered position or the raised position.
In addition, shows whether the single needle mode or twin needle mode is selected.

img : Lowered position / Single needle mode
img : Lowered position / Twin needle mode
img : Raised position / Single needle mode
img : Raised position / Twin needle mode
(6) Needle mode (single needle / twin needle)


Si vous n'avez pas obtenu de réponse satisfaisante à votre question, avez-vous vérifié d'autres FAQ?

Avez-vous consulté les manuels?

Pour toute assistance supplémentaire, contactez le service clientèle de Brother:

Modèles apparentés

CS10s, CS120WTs, CS70s, CX70PEs, FS40s, FS60x, FS70WTx, KD40s, KE20s

Commentaires sur le contenu

Merci d'indiquer vos commentaires ci-dessous. Ils nous aideront à améliorer notre support.

Étape 1: Comment qualifieriez-vous les informations figurant sur cette page?

Étape 2: Souhaitez-vous ajouter des commentaires?

Ce formulaire a pour seul but de nous faire part de vos commentaires.