MFC-9840CDW
Preguntas frecuentes y Solución de problemas |
¿Cómo imprimo en papel grueso, etiquetas y sobres desde la bandeja multipropósito en aplicaciones de Windows?
Utilice los pasos siguientes para imprimir en papel grueso, etiquetas y sobres.
- Especificaciones de los sobres
- Carga de sobres u otro soporte en la bandeja multipropósito
- Seleccionar desde el controlador de impresión
Especificaciones de los sobres:
Puede utilizar la mayoría de los sobres en su máquina; sin embargo, algunos sobres pueden causar problemas en la calidad de impresión por la forma en la que están hechos.
Un sobre adecuado debería tener los bordes con pliegues rectos y bien doblados. El borde no debería ser más grueso que dos hojas de papel. El sobre debería ser plano y no tener un diseño acolchado. Debería adquirir sobres de calidad de un distribuidor que entienda que va a utilizarlos en una máquina láser.
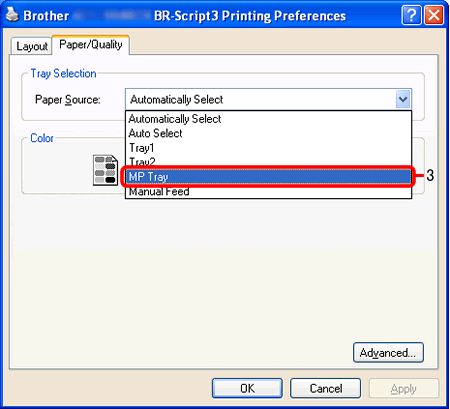
- Envelopes can only be fed from the Multi-purpose (MP) Tray.
- Use envelopes that weigh from 20 to 28 lbs. (80 to 105 g/m2).
- Some envelopes require margin settings to be set in the application you're printing from. Make sure to do a test print first.
- Envelopes should have a lengthwise sealing flap.
- The sealing flaps should be folded crisply and correctly. Irregularly cut or folded envelopes may cause paper jams.
- Envelopes should consist of two layers of paper in the area circled in the figure below.
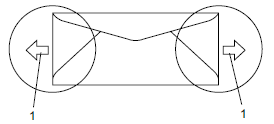 * 1 = Feeding direction
- Before you print envelopes, you must "fan" the stack to avoid paper jams and misfeeds.
- Before you print a lot of envelopes, test one to make sure that the printed results are what you want.
- Envelope joints that are sealed by the manufacturer should be secure.
- Do not put different types of paper in the paper tray at the same time. Doing so may cause paper jams and misfeeds.
- For proper printing, you must select the same paper or envelope side from your software application as the paper or envelopes in the tray.
- We recommend that you do not print within 0.6 in (15 mm) of the envelopes' edges.
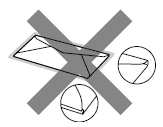
Do not use any of the following types of envelopes, as they will cause paper feed problems:
- Envelopes that are damaged, curled, or wrinkled.
- Envelopes that are an unusual shape.
- Envelopes that are extremely shiny or textured
- Envelopes that have self-adhesive closures.
- Envelopes of a baggy construction.
- Envelopes that are not sharply creased.
- Envelopes that have previously been printed by a laser machine.
- Envelopes that cannot be arranged neatly when stacked.
- Envelopes that exceed this machine's paper weight specifications.
- Envelopes with edges that are not straight or consistently square.
- Envelopes that are embossed (have raised writing or designs on them).
- Envelopes that have windows, holes, cut-outs, or perforations.
- Envelopes that have clasps or staples.
- Envelopes that are pre-printed on the inside.
- Self-adhesive envelopes with glue that is not on the flaps.
- Envelopes with a double flap.
Glue Double flap 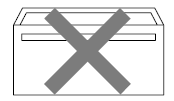
- Envelopes with sealing flaps that were not folded when purchased.
- Envelopes with sealing flaps as seen in the figure below.

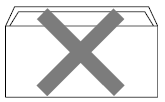
- Envelopes with each side folded as seen in the figure below.
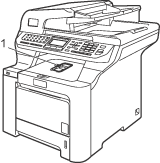
Loading envelopes or other media in the MP tray:
Use the MP tray when printing envelopes, labels, and thick paper. Before loading, press the corners and sides of the envelopes to make them as flat as possible.

- Unfold the output paper tray support flap (1).
- Open the MP tray and lower it gently.

- Pull out the MP tray support flap (1).
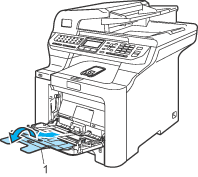
- Put the envelopes (up to 3) or media in the MP tray with the top edge first and the print side face up.
Make sure that the paper is straight and in the proper position in the MP tray. If it is not, the paper may not be fed properly, resulting in a skewed printout or a paper jam.
- While pressing the paper-guide release lever, slide the paper guide to fit the paper size.
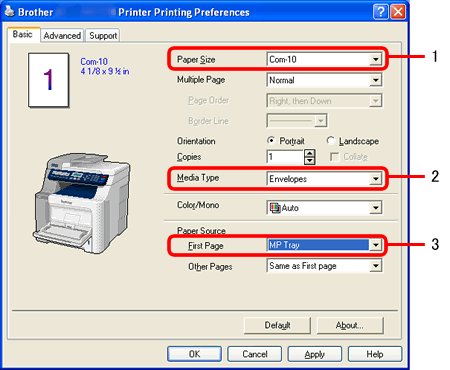
Select the following from the printer driver:
- Go to the application (e.g. Microsoft Word) that you want to print to the envelope and use that application's envelope settings to set the followings:
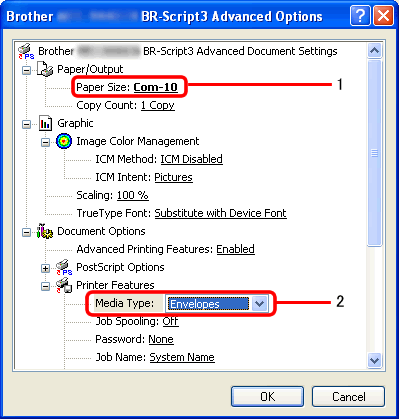
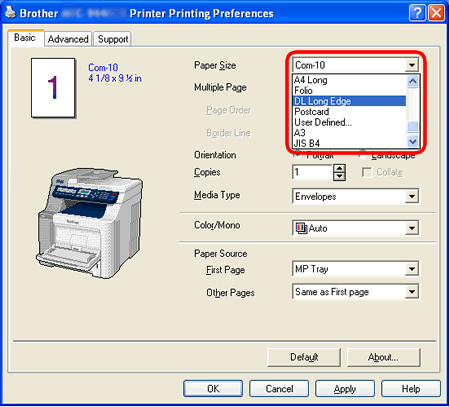
(1) Paper Size
(2) Media Type
(3) Paper Source
and any other settings.[Windows printer driver]
[BR-Script printer driver]
- To use the BR-Script printer driver you must install the driver using the Custom Install from the CDROM or download the BR-Script driver from Download Section and install the driver.
- When you use Envelope #10, choose Com-10 for the Paper Size.
- For other envelopes which are not listed in the printer driver, such as Envelope #9 or Envelope C6, choose User Defined....
- Send the print data to the printer.
- Remove each sheet or envelope at once after printing. Stacking the sheets or envelopes may cause the paper to jam or curl.
- If envelopes get smudged during printing set the Media Type to Thick Paper or Thicker Paper to increase the fixing temperature.
- If DL size double flap envelopes are creased after printing, select DL Long Edge in Paper Size, from the Basic tab. Put a new DL size double-flap envelope in the MP tray with the longest edge of the envelope in first, then print again.
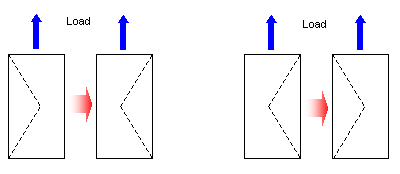
If the printed envelopes have wrinkles, please try to change the direction of the flap when loading.
En el caso de que no haya obtenido una respuesta a su pregunta, compruebe las preguntas frecuentes adicionales.
Comentarios sobre el contenido
Con el fin de mejorar nuestro servicio de asistencia, facilite sus comentarios a continuación.