PT-D600
FAQ & Fehlerbehebung |
How do I eliminate the margin from the start or end of my label when printing?
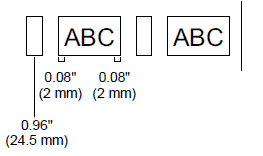
Due to the construction of the tape mechanism, the approximately 25 mm (one inch) piece of tape that is produced prior to every label cannot be eliminated. However, when you print more than one label continuously, the subsequent labels can be printed without the excess tape.
The following methods are useful for reducing tape use:
-
Method 1 - Selecting "Small Margin" in the Cut Option setting:
-
Press the [Function] key (
 ).
).
-
Press the arrow key
 or
or  to select "Cut Option".
-
Press the [OK] key (
 ) or [Enter] key (
  /
/  ).
).
-
Press the arrow key
 or
or  to select "Small Margin".
-
Press [OK] key (
 ) or [Enter] key (
  /
/  ).
).
-
Press the [Function] key (
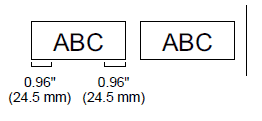
This eliminates the margin at the end of the tape after printing as shown below:
|
|
Large Margin
|
|
|
Small Margin |
-
Method 2 - Printing several labels at once by using the "Copies" function:
-
Press the [Function] key (
 ).
).
-
Press the arrow key
 or
or  to select "Cut Option".
-
Press [OK] key (
 ) or [Enter] key (
  /
/  ).
).
-
Press the arrow key
 or
or  to select "Small Margin".
-
Press [OK] key (
 ) or [Enter] key (
  /
/  ).
).
-
Press the [Print] key (
 /
/  ) and select the number of copies to be printed using the arrow
  or
or  key or type the number using the number keys.
-
Press the [Print] key (
 /
/  ), [OK] key (
  ) or [Enter] key (
  /
/  ).
).
-
Press the [Function] key (
This eliminates the margin of the subsequent labels as shown below:

- Method 3 - Printing several labels at once by using the "Numbering" function:
-
Press the [Function] key (
 ).
).
-
Press the arrow key
 or
or  to select "Cut Option".
-
Press the [OK] key (
 ) or [Enter] key (
  /
/  ).
).
-
Press the arrow key
 or
or  to select "Small Margin".
-
Press the [OK] key (
 ) or [Enter] key (
  /
/  ).
).
-
While holding down the [Shift] key (
 /
/  ), press the [Print] key (
  /
/  ) to display the print options screen.
-
Select "Number" using the arrow
 or
or  key.
key.
-
Press the [OK] key (
 ) or [Enter] key (
  /
/  ) and select the number of copies to be printed using the arrow
  or
or  key.
key.
-
Press the [Print] key (
 /
/  ), [OK] key (
  ) or [Enter] key (
  /
/  ).
).
- Method 4 - Printing different labels continuously:
-
Press the [Function] key (
 ).
).
-
Press the arrow key
 or
or  to select "Cut Option".
-
Press the [OK] key (
 ) or [Enter] key (
  /
/  ).
).
-
Press the arrow key
 or
or  to select "Chain".
-
Press the [OK] key (
 ) or [Enter] key (
  /
/  ).
).
-
Enter the text.
-
Press the [Print] key (
 /
/  ).
).
-
Select the number of copies to be printed using the arrow
 or
or  key or type the number using the number keys.
-
Press the [Print] key (
 /
/  ), [OK] key (
  ) or [Enter] key (
  /
/  ).
).
-
Repeat step 6 and 9 until all labels have been created.
-
After the last label is printed, hold down the [Shift] key (
 /
/  ) and press the [Preview] key (
  ) to feed and cut the tape.
An example of the labels:


