TD-4750TNWBR
FAQ et Diagnostic |
How to calibrate the RFID
For optimal calibration results, perform Media Calibration before RFID Calibration. Make sure you correctly install both the ribbon and the label roll.
-
Perform Media Auto Calibration:
Using the LCD menu:- Load the RFID media into the printer.
- (Thermal transfer only) Load the ribbon into the printer.
-
Press the Menu List icon (
 ).
). -
Select the Sensor icon (
 ).
). -
Select Auto Calibration > the media type >
 .
.

You can download the BPM from the [Downloads] section.
- Load the RFID media into the printer.
- (Thermal transfer only) Load the ribbon into the printer.
- Connect the USB cable between the computer and the printer.
- Start the BPM.
- Select the printer in the list, and then click the Printer Function button.
-
Click Calibrate.
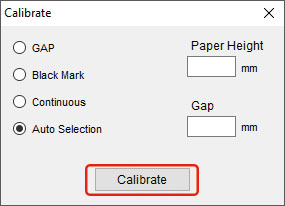
- Click Printer Configuration and make sure that the paper width and height in the FBPL tab are set correctly.
Send the AUTODETECT command using the BPM or Comm Tool.
You can download the tools from the [Downloads] sectionFor more information, see the FBPL Command Reference Manual in the [Manuals] section.
-
Check that the RFID antenna is set at the center of the RFID chip or the antenna loop on the tag.
-
Start RFID Calibration.
Using the LCD Menu:- Go to the RFID menu.
-
Select Interface (
 ) > RFID > Tag Calibration > Do RFID Calibrate > .

Send the AUTODETECT command using the BPM or Comm Tool.
You can download the tools from the [Downloads] section.For more information, see the FBPL Command Reference Manual in the [Manuals] section.
-
When the calibration is complete, the green screen appears. When it is not successful, the red screen is displayed.

Depending on the tag type and tag length, the calibration can take several minutes.
-
If the calibration failed, press
 or
or  to clear the error. This can be mostly solved by repositioning the Antenna Slide.
It also may be due to an incompatibility between the tag and the reader. After the calibration is complete, press or  to continue and save the RFID calibration values.
Si vous n'avez pas obtenu de réponse satisfaisante à votre question, avez-vous vérifié d'autres FAQ?
Commentaires sur le contenu
Merci d'indiquer vos commentaires ci-dessous. Ils nous aideront à améliorer notre support.