QL-600
FAQ et Diagnostic |
How do I install/change the label roll?
To install a new label roll:
-
Press and hold the ON/OFF button (
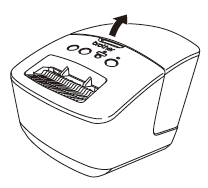
 ) to turn the printer off. Hold the printer by the front, and firmly lift the DK Roll compartment cover to open the cover.
<using an image of QL-700>
-
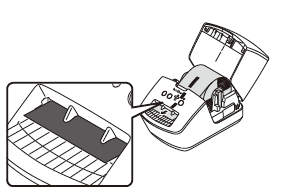
Place the DK Roll into the Roll Spool Guide (1).
- Make sure that the Roll Spool Arm (2) is inserted firmly in the Roll Spool Guide.
- Make sure the Stabiliser (3) slides into the notch of the printer.

-
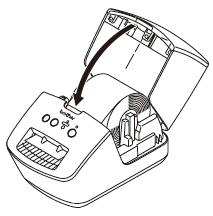
Thread the end of the DK Roll through the printer.
- Align the end of the roll with the upright edge of the label output slot.
- Check that the DK Roll is threaded straight so that the labels will not be skewed.
-
Close the DK Roll compartment cover.
-
When you press the ON/OFF button (
 ) to turn the printer on, the end of the DK Die-cut Label is aligned automatically.
-
When you press the ON/OFF button (
To remove a label roll:
-
Press the ON/OFF button () to turn the printer off. Hold the DK Roll compartment cover at the front of the printer and firmly lift up to open the cover.
-
Hold the label roll by the Roll Spool Arm and pull the inserted DK Roll up.
- Close the DK Roll compartment cover.
Si vous n'avez pas obtenu de réponse satisfaisante à votre question, avez-vous vérifié d'autres FAQ?
Commentaires sur le contenu
Merci d'indiquer vos commentaires ci-dessous. Ils nous aideront à améliorer notre support.