MFC-L9570CDW(T)
FAQ et Diagnostic
Carry out calibration to improve the color density
The output density and print position for each color may vary depending on the machine's environment, such as temperature and humidity.
NOTE: The screens may differ depending on operating system being used and your Brother machine.
Follow the steps listed below to carry out calibration from the control panel .
Press (Toner) => Calibration => Calibrate .
Press Yes to confirm.
Press (Home) .
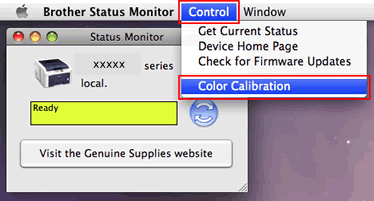
Follow the steps listed below to carry out calibration from the status monitor .
For macOS v10.10 - v10.15:
Run System Preferences , select Printers & Scanners , and then select the machine.
Click Options & Supplies... . Click the Utility tab, and then click Open Printer Utility . The Status Monitor will start up.
Now the status monitor is turned on.
Go to the menu bar, click Control => Color Calibration .
Color Calibration dialog appears. Read the message and click OK . The machine starts color calibration and then the printer driver attempt to get the calibration data from the machine.
Si vous n'avez pas obtenu de réponse satisfaisante à votre question, avez-vous vérifié d'autres FAQ?
Avez-vous consulté les manuels?
Pour toute assistance supplémentaire, contactez le service clientèle de Brother:
Modèles apparentés DCP-L8410CDW, HL-L8360CDW, HL-L9310CDW(T), MFC-L8690CDW, MFC-L8900CDW, MFC-L9570CDW(T), MFC-L9577CDW
Commentaires sur le contenu
Merci d'indiquer vos commentaires ci-dessous. Ils nous aideront à améliorer notre support.
Messages d'erreur Entraînement du papier / bourrage papier Impression Numérisation Copie Téléphone Fax Mobile Cloud Autres Fonctions avancées (pour les administrateurs) Linux Installation du produit Pilote / logiciel Paramètres réseau Consommables / papier / accessoires Nettoyage Caractéristiques Informations de support des systèmes d'exploitation FAQ vidéo
Réglages/Gestion Contrôle de fonctions amélioration de la sécurité Fonctions utiles Imprimante Scanner / Scan Key Tool PC-FAX / Modem-Fax Message d'erreur sur l'écran de l'appareil Message d'erreur de Status Monitor Message d'erreur sur l'ordinateur Message d'erreur sur l'appareil mobile Bourrage papier Problème d'entraînement du papier Chargement et gestion du papier Impression impossible (par le réseau) Impression impossible (par interface USB / parallèle) Impression impossible (par un appareil mobile) Problème de qualité d'impression Problème général d'impression Impression à partir d'un ordinateur (Windows) Impression à partir d'un ordinateur (Macintosh) Impression à partir d'un appareil mobile Paramètres d'impression / gestion Conseils pour l'impression Numérisation impossible (par le réseau) Numérisation impossible (par interface USB / parallèle) Numérisation impossible (par un appareil mobile) Problème général de numérisation Numérisation à partir de l'appareil Numérisation à partir d'un appareil mobile Numérisation à partir d'un ordinateur (Windows) Numérisation à partir d'un ordinateur (Macintosh) Paramètres de numérisation / gestion Conseils pour la numérisation Problème de qualité de copie Opération de copie Paramètres de copie / gestion Problème de téléphone Utilisation du téléphone Réglages du téléphone Réseau avancé Problème de paramètres sur réseau câblé Problème de paramètres sur réseau sans fil Paramètres de réseau câblé Paramètres de réseau sans fil Conseils pour les paramètres réseau Envoi de fax impossible Réception de fax impossible Problème de qualité de fax Problème général de fax Opération d'envoi de fax Opération de réception de fax Opération d'envoi de fax à partir d'un ordinateur (PC-Fax) Opération de réception de fax avec un ordinateur (PC-Fax) Paramètres de fax / gestion Problème lié à un appareil iOS Brother iPrint&Scan / Mobile Connect (iOS) AirPrint (iOS) Problème lié à un appareil Android™ Brother iPrint&Scan / Mobile Connect (Android™) Brother Image Viewer (appareil Android™) Problème lié à un appareil Windows Phone Brother iPrint&Scan (appareil Windows Phone) Brother Web Connect Problème lié à Google Cloud Print™ Problème lié à l'appareil Installation / paramètres de l'appareil Gestion du papier Installation d'accessoires FAQ vidéo Installation des pilotes et des logiciels Mise à jour des pilotes et des logiciels Désinstallation des pilotes et des logiciels Paramètres des pilotes et des logiciels Conseils sur les pilotes et les logiciels Consommables Papier Accessoires Nettoyage Caractéristiques du produit Caractéristiques du papier Support Windows Support Macintosh Vidéo d'installation
 (Toner) => Calibration => Calibrate.
 (Home).
