HL-6180DW
FAQ & Fehlerbehebung |
Jam Tray 1 or Jam Tray 2
Please follow the steps below to clear the message Jam Tray 1 or Jam Tray 2.
NOTE: Illustrations shown below are from a representative product and may differ from your Brother machine.
-
Leave the machine turned on for 10 minutes for the internal fan to cool the extremely hot parts inside the machine.
-
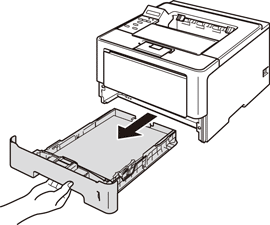
Pull the paper tray completely out of the printer.

-
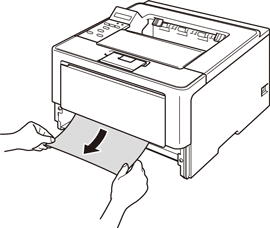
Use both hands to slowly pull out the jammed paper.

Pulling the jammed paper downward allows you to remove the paper more easily.
- Put paper below the maximum paper mark. While pressing the green paper-guide release lever, slide the paper guides to fit the paper size. Make sure that the guides are firmly in the slots.
-
Put the paper tray firmly back in the printer.
If you turn off the machine during paper jam, the machine will print incomplete data from your computer. Before you turn on the machine, delete the print spool job on your computer.
-
Open the front cover and close it to resume printing.
-
For models without LCD:
Make sure that the Paper and Error LEDs are off and the Ready LED is green.
DO NOT take out the standard paper tray while paper is feeding from a lower paper tray as this will cause a paper jam.
