HL-6050DN
FAQ et Diagnostic |
How do I install the Optional Tray Unit? - For Europe and Asia/Oceania
-
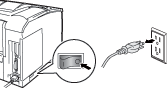
Turn off the printer power switch, and remove all the cables from the machine.
-
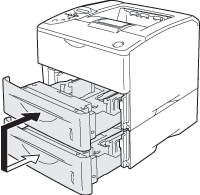
Lift the machine from the front by carefully gripping the recessed handles on the side of the machine and place it onto the lower tray unit, making sure that the alignment prints of the lower tray unit are inserted into the guide holes on the bottom of the machine.

-
Remove the paper tray from the lower tray option, and swap it with the tray already fitted in your machine. Reconnect all cables and switch on the printer.
-
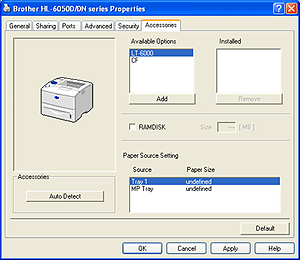
Go to Start > Settings > Printers. Right click on your printer and choose Properties. Choose the Accessories tab and click Autodetect, once the lower tray has been detected then click Apply. (Under certain conditions the Autodetect function may be unavailable.)
Si vous n'avez pas obtenu de réponse satisfaisante à votre question, avez-vous vérifié d'autres FAQ?
Commentaires sur le contenu
Merci d'indiquer vos commentaires ci-dessous. Ils nous aideront à améliorer notre support.