1134DW/ 1134D
FAQ et Diagnostic |
Threading the right needle (on Two-needle models)
Run the thread in the sequence illustrated, following the pink color and the numbers next to each threading point.

-
Pull the thread off the spool and directly up through the thread guide on the thread tree from back to front.
Pull the thread about an extra 15cm (6inches) through the front of the thread tree.

-
Pass the thread through the proper thread guide.
-
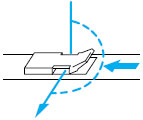
Slide and hold the thread tension release button to the right, then pass the thread through the tension disc which is in the channel next to the pink tension adjustment dial.
Release the button.

-
Guide the thread down the channel and across through the threading points next to the pink color marks following the numerical order in the accompanying illustration.
-
Bring the thread down through the guide 7 above the needle and through the right needle from front to back.