Innov-is XE1
Veelgestelde vragen en probleemoplossing |
How do I thread my machine ?
- Be sure to thread the machine properly. Improper threading can cause the thread to tangle and break the needle, leading to injury.
- The automatic threading function can be used with home sewing machine needle size 75/11.
-
The following threads are incompatible with the needle threader. Manually pass the thread through the eye of the needle.
- Speciality threads such as metallic threads
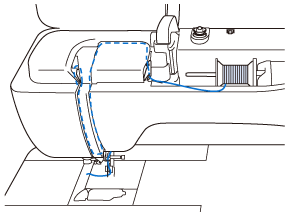
-
Turn the main power to ON.
-
Press
 (Presser foot lifter button) to raise the presser foot.
>> The upper thread shutter opens so the machine can be threaded.
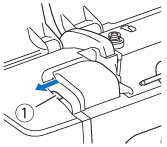
(1) Upper thread shutter
-
Press
 (Needle position button) to raise the needle.
If you try to thread the needle automatically without raising the needle, the needle may not be thread correctly and the needle threader may be damaged.
-
Remove the spool cap and place the spool of thread onto the spool pin. Slide the spool onto the spool pin so that the thread unwinds to the front from the bottom.
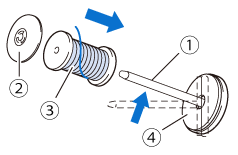
(1) Spool pin (2) Spool cap (3) Spool of thread (4) Spool felt
-
Slide the spool cap onto the spool pin as far as possible to the right, with the rounded side on the left.
-
Choose a spool cap that best fits the size of spool being used.
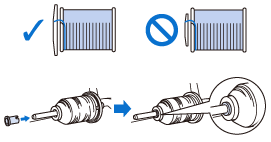
- If the spool or the spool cap is not positioned correctly, the thread may become tangled around the spool pin or the needle may break.
When using thread that winds off quickly, such as metallic thread, place the spool net over the spool before placing the spool of thread onto the spool pin. If the spool net is too long, fold it to fit the size of the spool.
When threading the spool with the spool net on, make sure that about 5 cm (2 inches) of thread is pulled out. It may be necessary to adjust the thread tension when using the spool net.

-
Choose a spool cap that best fits the size of spool being used.
- While holding the thread with both hands, pass the thread through grooves of the thread guide plate.
(1) Thread guide plate
-
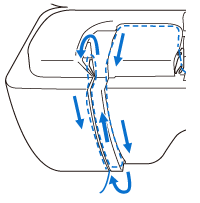
While holding the thread in your right hand, pass the thread through the thread guide in the direction indicated.
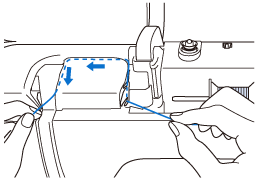
-
Guide the thread down, up, then down through the groove, as shown in the illustration.
Look in the upper groove area to check if the thread catches on the thread take-up lever visible inside the upper groove area.
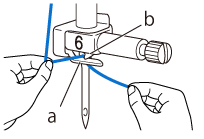
- Pass the thread through the needle bar thread guide (marked 6) by holding the thread with both hands and guiding it as shown in the illustration.
(1) Needle bar thread guide
(2) Tab
-
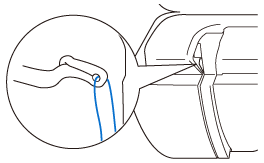
Pass the thread through the notch in the thread guide. Then firmly pull the thread from front to back into the slit of the thread guide disk (marked 7).
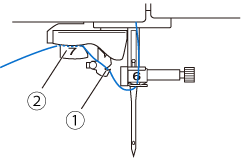
(1) Notch in thread guide
(2) Thread guide disk
-
Press
 (Presser foot lifter button) to lower presser foot.
-
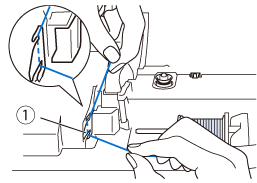
Pull the thread up through the thread cutter to cut the thread, as shown in the illustration.
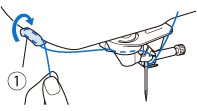
(1) Thread cutter When using thread that quickly winds off the spool, it may be difficult to thread the needle if the thread is cut.
Therefore, instead of using the thread cutter, pull out about 8 cm (3 inches) of thread after passing it through the thread guide disks (marked 7).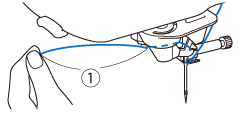
(1) About 8 cm (3 inches) or more
-
Press
 (Automatic threading button) to have the machine automatically thread the needle.
>> The thread passes through the eye of the needle.
-
When
 (Automatic threading button) is pressed, the presser foot will be automatically lowered. After threading is finished, the presser foot moves back to the position before
  (Automatic threading button) was pressed.
 -
Some needles and threads cannot be threaded with the needle threader. In this case, instead of using the needle threader after passing the thread through the needle bar thread guide (marked 6), manually pass the thread through the eye of the needle from the front.
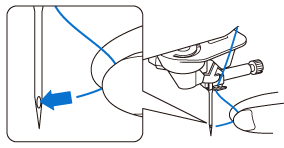
-
When
-
Carefully pull the end of the thread that was passed through the eye of the needle.
-
If a loop was formed in the thread passed through the eye of the needle, carefully pull on the loop of thread through to the back of the needle.
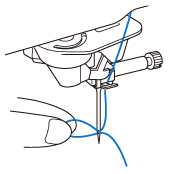
-
If a loop was formed in the thread passed through the eye of the needle, carefully pull on the loop of thread through to the back of the needle.
-
Raise the presser foot lever and pull out about 10 cm (4 inches) of the thread, and then pass it under the presser foot toward the rear of the machine.
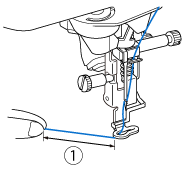
(1) About 10 cm (4 inches)
