RJ-2035B
FAQ & Fehlerbehebung |
How to execute the printer configuration (Self-test) to debug
The printer calibrates the sensor, detects the media length, prints internal settings, and then enters dump mode. This mode allows you to verify and debug the printer's programs.
To perform the printer self-test and enter dump mode:
Dump mode requires 50.8 mm (2″) wide paper.
- Turn off the printer.
-
Press and hold the Feed/Pause Button (
 ) and then turn on the printer.
 -
Release the Feed/Pause button ( ) when the printer's Status LED changes to (
 ) and starts blinking.
The LEDs will change as follows:
(Orange) 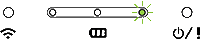
(5 times) 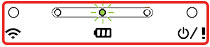
(5 times) -> Release the Feed/Pause button (  ) to perform the printer self-test and enter dump mode.
(5 times) 
(Green (lit))
To resume printing, turn the printer off and then on again.
The self-test information is printed automatically.
Rückmeldung zum Inhalt
Helfen Sie uns dabei, unseren Support zu verbessern und geben Sie uns unten Ihre Rückmeldung.