| Faint | If the machine displays the Replace Toner status, install a new toner cartridge. Check the machine’s environment. Conditions such as humidity, high temperatures, and so on, may cause this print fault. If the whole page is too light, Toner Save mode may be turned on. Turn Toner Save mode off in the machine's menu settings or the printer driver. Clean the corona wire on the drum unit. Replace the toner cartridge with a new toner cartridge. Replace the drum unit with a new drum unit. |
| Grey background | Check the machine’s environment. Conditions such as high temperatures and high humidity can increase the amount of background shading. Replace the toner cartridge with a new toner cartridge. Replace the drum unit with a new drum unit. |
| Ghosting images | |
| Toner specks | |
| Hollow print | Select Thick Paper mode in the printer driver or use thinner paper than you are currently using. (For models with an LCD) Select the appropriate media type from the paper type options on your machine. Check the machine’s environment. Conditions such as high humidity can cause hollow print. The drum unit may be damaged. Replace the drum unit with a new drum unit. |
| All black | Clean the corona wire inside the drum unit. The drum unit may be damaged. Replace the drum unit with a new drum unit. |
| White lines across the page | Select the appropriate media type in the printer driver. (For models with an LCD) Select the appropriate media type from the paper type options on your machine. The problem may disappear by itself. Print several blank pages to clear this problem, especially if the machine has not been used for a long time. The drum unit may be damaged. Replace the drum unit with a new drum unit. |
| Lines across the page | The drum unit may be damaged. Replace the drum unit with a new drum unit. |
| White lines, bands or ribbing across the page | Check the machine's environment. Conditions such as high humidity and high temperatures may cause this print quality problem. If the problem is not solved after printing a few pages, replace the drum unit with a new drum unit. |
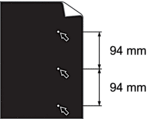
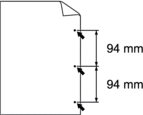
| White spots on black text and graphics at 94 mm intervals Black spots at 94 mm intervals | If the problem is not solved after printing a few pages, the drum unit may have foreign material, such as glue from a label, stuck on the drum. Clean the drum unit. See Related Information:Clean the Drum Unit. The drum unit may be damaged. Replace the drum unit with a new drum unit. |
| Black toner marks across the page | If you use label sheets for laser printers, the glue from the sheets may sometimes stick to the drum surface. Clean the drum unit. See Related Information:Clean the Drum Unit. If you used paper that has clips or staples, the drum unit may be damaged. If the unpacked drum unit is in direct sunlight (or room light for long periods of time), the unit may be damaged. The toner cartridge may be damaged. Replace the toner cartridge with a new toner cartridge. The drum unit may be damaged. Replace the drum unit with a new drum unit. |
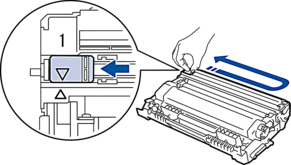
| Black lines down the page Printed pages have toner stains down the page | Clean the corona wire inside the drum unit by sliding the green tab. Make sure the green tab of the corona wire is in the Home position (1). The toner cartridge may be damaged. Replace the toner cartridge with a new toner cartridge. The drum unit may be damaged. Replace the drum unit with a new drum unit. The fuser unit may be contaminated. Contact Brother customer service. |
| White lines down the page | Make sure there is no foreign material, such as a torn piece of paper, sticky notes or dust, inside the machine and around the toner cartridge and drum unit. The toner cartridge may be damaged. Replace the toner cartridge with a new toner cartridge. The drum unit may be damaged. Replace the drum unit with a new drum unit. |
| Image skewed | Make sure the paper or other print media is loaded correctly in the paper tray and the guides are not too tight or too loose against the paper stack. Set the paper guides correctly. The paper tray may be too full. Check the paper type and quality. Check for loose objects such as torn paper inside the machine. If the problem only occurs during automatic 2-sided printing, check for torn paper in the 2-sided tray. Verify the 2-sided tray is inserted completely and the back cover is closed completely. |
| Curled or wavy image | Check the paper type and quality. High temperatures and high humidity will cause paper to curl. If you do not use the machine often, the paper may have been in the paper tray too long. Turn over the stack of paper in the paper tray. Also, fan the paper stack, and then rotate the paper 180° in the paper tray. Open the back cover (face up output tray) to let the printed paper exit onto the face up output tray. Choose Reduce Paper Curl mode in the printer driver when you do not use our recommended print media. |
| Wrinkles or creases | |
| Poor fixing | |
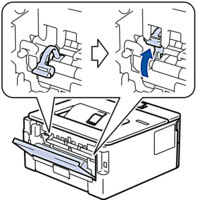
| Envelope creases | Make sure the two green levers inside the back cover are pulled down to the envelope position when you print envelopes. After you have finished printing, reset the levers back to their original position. Pull up the levers until they stop. Make sure envelopes are printed with the back cover (face up output tray) opened. (For models with Manual Feed Slot) Make sure envelopes are fed only from the manual feed slot. |


