Print server configuration for Windows® 2000/XP, Windows Vista™ and Windows Server® 2003

Print server configuration

In order for this function to work, you must correctly change the domain name or workgroup name to match that of your network. Once this is done, the print server will appear automatically in your network neighborhood and you will be able to send print documents to it without having to install additional software.
A domain offers centralized security management whereas a workgroup offers distributed security management. The print server does not care if your network consists of a Workgroup or a Domain, the only thing you must tell it is the name of the workgroup or domain. The Brother print server automatically has a default workgroup/domain name of WORKGROUP. If you need to change name, you can configure the Brother print server to recognize this. There are three ways of doing this. (If you are unsure about the name of your workgroup or domain, look in the identification tab in your network applet).

Changing the Workgroup/Domain Name using the BRAdmin Professional utility

Note Note
• 
You cannot change the workgroup/domain name using the BRAdmin Light utility that was supplied on the CD-ROM with your Brother product. Please use the latest version of BRAdmin Professional utility that is available as a download from http://solutions.brother.com This utility is only available for Windows® users.
• 
The print server must have a valid IP address and your computer must also have a valid IP address; you can configure the IP address by using BRAdmin Light or BRAdmin Professional. See Using the BRAdmin Light utility to configure your network printer.
• 
The default password for Brother print servers is access.
1
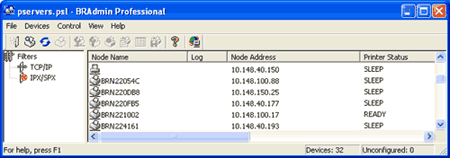
Start the BRAdmin Professional utility (from Windows® 98/Me, Windows NT® 4.0, Windows® 2000/XP, Windows Vista™ and Windows Server® 2003), by clicking Start / All Programs1 / Brother Administrator Utilities / Brother BRAdmin Professional Utilities / BRAdmin Professional.
1
Programs for Windows® 98/Me, Windows NT® 4.0, and Windows® 2000 users
Screen
2
Select TCP/IP in the left frame of the main BRAdmin window.
3
Select the print server which you want to configure, in the right frame of the main BRAdmin window.
4
Select Configure Print Server from the Control menu.
5
Enter a password. The default Password is access.
6
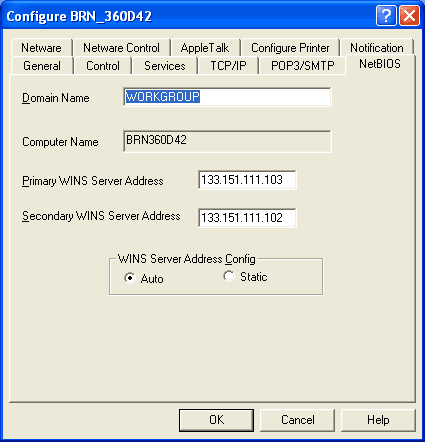
Select NetBIOS tab. Enter a workgroup/domain name.
Screen
Note Note
 
Because of the way that Microsoft® networks work, the print server may take several minutes to appear in the network neighborhood. You will also find that the print server may take several minutes to disappear from the network neighborhood even if the printer is switched off. This is a feature of Microsoft® workgroup and domain based networks.

Changing the Workgroup/Domain Name using Web Based Management (web browser)

You can also use a standard web browser to change the NetBIOS name. To do this, connect to the print server using its IP address (see Using Web Based Management (web browser) to change the print server settings) and then select the Configure NetBIOS option from the Network Configuration screen, then enter your workgroup/domain name into the Domain Name text box. Make sure you submit the changes (click Submit).

Changing the Workgroup/Domain Name using Telnet

If you are unable to use the BRAdmin Professional utility, you can use Telnet.
When you are connected to the print server, enter the default password access in response to the # prompt. Type in anything in response to the Enter Username> prompt, you will then be at the Local> prompt.
• 
Now enter the command:
SET NETBIOS DOMAIN domainname
EXIT
Where domainname is the name of the domain or workgroup that you are on. If you are not sure what your domain name or workgroup name is, look in the Identification tab in your Windows® 2000/XP, Windows Vista™ and Windows Server® 2003 network applet.