To use the E-mail notification function via secure SMTP server that requires a user authentication, you need to use
POP before SMTP or
SMTP-AUTH methods. These methods prevent an unauthorized user from accessing the mail server. You can use Web Based Management (web browser), BRAdmin Professional and Web BRAdmin to configure these settings.

Note
| | You need to match the settings of POP3/SMTP authentication with one of the E-mail servers. Contact your network administrator or your internet service provider about the configuration before using. |
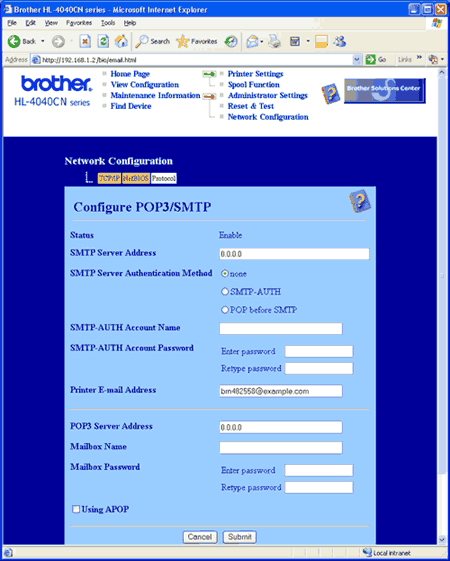
How to configure the POP3/SMTP settings using Web Based Management (web browser).
| 1 | Start your web browser. |
| 2 | Type http://printer_ip_address/ into your browser. (Where printer_ip_address is the IP address or the print server name) | • | For example: http://192.168.1.2/ (if the printer’s IP address is 192.168.1.2.) |
Note | | If you have edited the hosts file on your computer or are using a Domain Name System, you can also enter the DNS name of the print server. As the print server supports TCP/IP and NetBIOS, you can also enter the NetBIOS name of the print server. The NetBIOS name can be seen on the printer settings page. The NetBIOS name assigned is the first 15 characters of the node name and by default it will appear as “ BRNxxxxxx” for a wired network or “ BRWxxxxxx” for a wireless network (where “ xxxxxx” is the last six digits of the Ethernet address). |
|
| 3 | Click Network Configuration. |
| 4 | Click Configure Protocol. |
| 5 | Click Advanced Setting of POP3/SMTP. |
| 6 | You can configure the POP3/SMTP settings on this page.
Note | • | If you can use both POP before SMTP and SMTP-AUTH, we recommend choosing SMTP-AUTH. | | • | If you choose POP before SMTP for the SMTP Server Authentication Method, you need to configure POP3 settings. You can also use the APOP method. | | • | For more information, see the Help text in the Web Based Management. | | • | You can also confirm whether the E-mail settings are correct after configuration by sending a test E-mail. |
|
| 7 | After configuring, click Submit. The Test E-mail Send/Receive Configuration dialog appears. |
| 8 | Follow the instructions on-screen if you want to test with the current settings. |