For more information about Secure Function Lock 2.0, see Chapter 14 of the Network User’s Guide on the CD-ROM we have supplied.
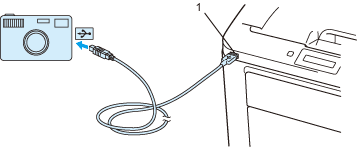
| 1 | Make sure that your camera is turned off. Connect your camera to the USB direct interface (1) on the front of the printer using a suitable USB cable. |
| 2 | Turn on the camera. The following message appears if Secure Function Lock is on. Press OK. Function Lock  |
|
| 3 | Press + or - to choose ID. Press OK ID Name 1 |
|
| 4 | Enter the password. Press OK PIN : XXXX |
 Note | | If your ID has the restricted options, the following messages appear on the LCD. Message | Meaning | Access Denied | Printing pictures directly from a camera to the Brother machine is restricted. | Limit Exceeded | The number of pages you are allowed to print is exceeded. The print job will be canceled. | Mono Print Only | Printing color documents is restricted. | Not Available | Printing pictures directly from a camera to the Brother machine is restricted. |
|
|
| 5 | The following message appears if the password is correct. Camera Connected |
|
| 6 | Set your camera to print an image. Set the number of copies if you are asked.
When the printer starts printing a photo, the LCD will show Printing. |


IMPORTANT
| | DO NOT remove the digital camera from the USB direct interface until the printer has finished printing. |