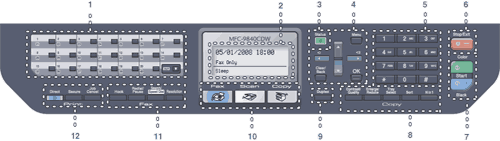
| 1. | One-Touch keys These 20 keys give you instant access to 40 previously stored numbers. Shift Lets you access One-Touch numbers 21 to 40 when held down. |
| 2. | Displays messages to help you set up and use your machine. |
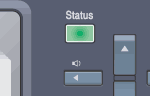
| 3. | The LED will flash and change color depending on the machine status. |
| 4. | Menu keys: Menu Lets you access the Menu to program your settings in this machine. Clear/Back Deletes entered data or lets you cancel the current setting. OK Lets you store your settings in the machine. Volume keys Press to scroll backwards or forwards through menu selections. Press to change the volume when in fax or standby mode. Press to scroll through the menus and options. |
| 5. | Dial pad Use these keys to dial telephone and fax numbers and as a keyboard for entering information into the machine. (Canada only) The # key temporarily switches the dialing mode from Pulse to Tone during a telephone call. |
| 6. | Stop/Exit Stops an operation or exits from a menu. |
| 7. | Start: Color Lets you start sending faxes or making copies in full color. Black Lets you start sending faxes or making copies in black & white.
|
| 8. | Lets you change the quality or contrast for the next copy. Enlarge/Reduce Reduces or enlarges copies. Lets you change which tray will be used for the next copy. Sorts multiple copies using the ADF. You can choose N in 1 copy to 2 or 4 pages onto one page. |
| 9. | You can choose Duplex to copy on both sides of paper. |
| 10. | Mode keys: Puts the machine in Fax mode. Puts the machine in Scan mode. (For details about scanning, see the Software User’s Guide on the CD-ROM.) Puts the machine in Copy mode. |
| 11. | Fax and telephone keys: Press before dialing if you want to make sure a fax machine will answer, and then press Black Start or Color Start. Also, press this key after you pick up the handset of an external telephone during the F/T ring (fast double-rings). Redial/Pause Redials the last number called. It also inserts a pause when programming quick dial numbers. Search/Speed Dial Lets you look up numbers stored in the quick-dial memory and LDAP server. You can search the stored number by alphabetically It also lets you look up the stored number in Speed-Dial numbers by pressing Shift and Search/Speed Dial simultaneously and then the three-digit number. Sets the resolution when sending a fax. |
| 12. | Lets you print data from a USB flash memory drive that you can connect directly to the machine. You can also print images directly from your PictBridge compatible camera. When using Secure Function Lock, you can switch restricted users by holding down Shift as you press the Secure key. (See Secure Function Lock.) You can print data saved in memory when you enter your four-digit password. (For details about using the Secure key, see the Software User’s Guide on the CD-ROM.) Cancels a programmed print job and clears print data in machine’s memory. |
LED | Machine Status | Description |
Sleep Mode | The power switch is off or the machine is in Sleep mode. | |
Green | Warming Up | The machine is warming up for printing. |
Green | Ready | The machine is ready to print. |
Yellow | Receiving Data | The machine is either receiving data from the computer, processing data in memory, or printing data. |
Yellow | Data Remaining in Memory | Print data remains in the machine memory. |
Red | Service error | Follow the steps below. 1. Turn off the power switch. 2. Wait a few seconds, and then turn it back on and try to print again. If you cannot clear the error and you see the same service call indication after turning the machine back on, please call Brother Customer Service. (See Brother numbers.) |
Red | Cover open | The front cover or fuser cover is open. Close the cover. |
Toner Life End | Replace the toner cartridge with a new one. | |
Paper error | Put paper in the tray or clear the paper jam. Check the LCD message. | |
Scan lock | Check that the scanner lock lever is released. | |
Others | Check the LCD message. | |
Out of memory | Memory is full. |