Settings in the Scanner Setup dialog box

Image Type

Choose the output image type from Photo, Web or Text. Resolution and Scan Type will be altered for each default setting.
The default settings are listed in the table below:
Image Type
Resolution
Scan Type
Photo
Use for scanning photo images.
300 × 300 dpi
24-bit color
Web
Use for attaching the scanned image to web pages.
100 × 100 dpi
24-bit color
Text
Use for scanning text documents.
200 × 200 dpi
Black & White

Resolution

You can choose a scanning resolution from the Resolution drop-down list. Higher resolutions take more memory and transfer time, but produce a finer scanned image. The following table shows the resolutions you can choose and the available colors.
Resolution
Black & White/
Gray (Error Diffusion)
256 color
True Gray/24 bit color
100 × 100 dpi
Yes
Yes
Yes
150 × 150 dpi
Yes
Yes
Yes
200 × 200 dpi
Yes
Yes
Yes
300 × 300 dpi
Yes
Yes
Yes
400 × 400 dpi
Yes
Yes
Yes
600 × 600 dpi
Yes
Yes
Yes
1200 × 1200 dpi
Yes
No
Yes
2400 × 2400 dpi
Yes
No
Yes
4800 × 4800 dpi
Yes
No
Yes
9600 × 9600 dpi
Yes
No
Yes
19200 × 19200 dpi
Yes
No
Yes

Scan Type

• 
Black & White
Use for text or line art.
• 
Gray (Error Diffusion)
Use for photographic images or graphics. (Error Diffusion is a method for creating simulated gray images without using true gray dots. Black dots are put in a specific pattern to give the appearance of gray.)
• 
True Gray
Use for photographic images or graphics. This mode is more exact because it uses up to 256 shades of gray.
• 
256 Color
Uses up to 256 color to scan the image.
• 
24 bit Color
Uses up to 16.8 million color to scan the image.
Although using 24 bit Color creates an image with the most accurate color, the image file will be about three times larger than a file created with 256 Color. It requires the most memory and has the longest transfer time.

Brightness

Adjust the setting (-50 to 50) to get the best image. The default value is 0, representing an average.
You can set the Brightness level by dragging the slide bar to the right or left to lighten or darken the image. You can also enter a value in the box to set the level.
If the scanned image is too light, set a lower Brightness level and scan the document again. If the image is too dark, set a higher Brightness level and scan the document again.
Note Note
 
The Brightness setting is only available when Black & White, Gray or True Gray is chosen.

Contrast

You can increase or decrease the Contrast level by moving the slide bar to the left or right. An increase emphasizes dark and light areas of the image, while a decrease reveals more detail in gray areas. You can also enter a value in the box to set the Contrast.
Note Note
 
The Contrast setting is only available when Gray or True Gray is chosen.
When scanning photographs or other images for use in a word processor or other graphics application, try different settings for the contrast and resolution to see which setting best suits your needs.

Document Size

Choose one of the following sizes:
• 
A4 210 × 297 mm
• 
JIS B5 182 × 257 mm
• 
Letter 8 1/2 × 11 in
• 
Legal 8 1/2 × 14 in
• 
A5 148 × 210 mm
• 
Executive 7 1/4 × 10 1/2 in
• 
Business Card
To scan business cards, choose the Business Card size, and then put the business card face down at the center of the scanner glass.
• 
Photo 4 × 6 in
• 
Index Card 5 × 8 in
• 
Photo L 89 × 127 mm
• 
Photo 2L 127 × 178 mm
• 
Postcard 1 100 × 148 mm
• 
Postcard 2 148 × 200 mm
• 
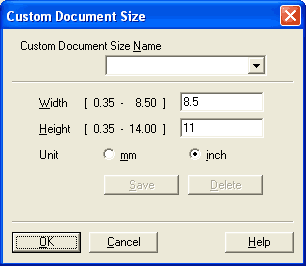
Custom (User adjustable from 0.35 × 0.35 in to 8.5 × 14 in or 8.9 × 8.9 mm to 215.9 × 355.6 mm)
If you choose Custom as the size, the Custom Document Size dialog box appears.
Graphic
Enter the Name, Width and Height for the document.
You can choose ‘mm’ or ‘inch’ as the unit for Width and Height.
Note Note
 
You can see the actual paper size you chose on the screen.
Graphic
• 
Width: shows the width of scanning area
• 
Height: shows the height of scanning area
• 
Data Size: shows the rough data size in Bitmap format. The size will be different for other file formats such as JPEG.