Start the ScanSoft™ PaperPort™ 11SE software that was installed during the MFL-Pro Suite installation to scan a document.
Note
The instructions for scanning in this Guide are for when you use ScanSoft™ PaperPort™ 11SE. The scanning steps may vary when using other software applications.
2
Click File, then Scan or Get Photo. You can also click the Scan or Get Photo button.
The Scan or Get Photo panel appears on the left side of the screen.
3
Click Select button.
4
Choose the scanner you are using from the Available Scanners drop-down list.
Note
•
For Windows® XP/Windows Vista™:
Choose TW-Brother MFC-XXXX (TW-Brother DCP-XXXX) or TW-Brother MFC-XXXX LAN (TW-Brother DCP-XXXX LAN).
•
For other operating systems:
Choose Brother MFC-XXXX (Brother DCP-XXXX) or Brother MFC-XXXX LAN (Brother DCP-XXXX LAN). (Where XXXX is your model name)
5
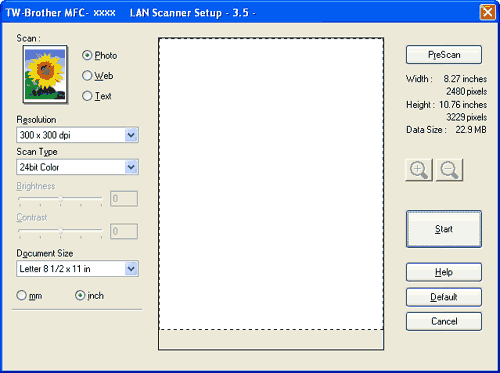
Check the Display scanner dialog box on the Scan or Get Photo panel.