Your machine is equipped with an ink dot counter. The ink dot counter automatically monitors the level of ink in each of the 4 cartridges. When the machine detects an ink cartridge is running out of ink, the machine will tell you with a message on the LCD.
The LCD will tell you which ink cartridge is low or needs replacing. Be sure to follow the LCD prompts to replace the ink cartridges in the correct order.
Even though the machine tells you to replace an ink cartridge, there will be a small amount of ink left in the ink cartridge. It is necessary to keep some ink in the ink cartridge to prevent air from drying out and damaging the print head assembly.


IMPORTANT
| | Brother multifunction machines are designed to work with ink of a particular specification and will work to a level of optimum performance and reliability when used with genuine Brother Original ink cartridges. Brother cannot guarantee this optimum performance and reliability if ink or ink cartridges of other specifications are used. Brother does not therefore recommend the use of cartridges other than genuine Brother Original cartridges or the refilling of used cartridges with ink from other sources. If damage is caused to the print head or other parts of this machine as a result of using other brands of ink or ink cartridges, any repairs required as a result may not be covered by the warranty. |

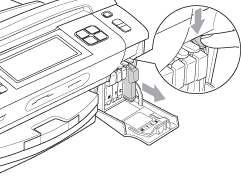
| 1 | Open the ink cartridge cover. If one or more ink cartridges have reached the end of their life, the LCD shows B&W Print Only or Cannot Print. |
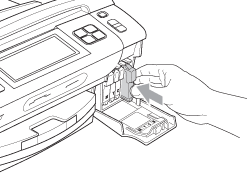
| 2 | Press the lock release lever as shown to release the cartridge indicated on the LCD. Remove the cartridge from the machine. |
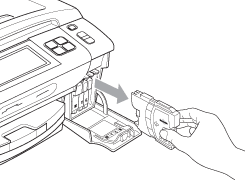
| 3 | Open the new ink cartridge bag for the colour shown on the LCD, and then take out the ink cartridge. |
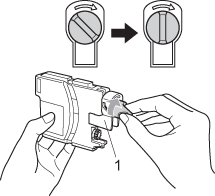
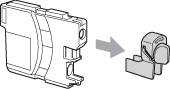
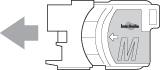
| 4 | Turn the green knob on the protective yellow cap clockwise until it clicks to release the vacuum seal, then remove the cap (1). |
| 5 | Each colour has its own correct position. Insert the ink cartridge in the direction of the arrow on the label. |
| 6 | Gently push the ink cartridge until it clicks, and then close the ink cartridge cover. |
| 7 | The machine will automatically reset the ink dot counter. |

Note
| • | If you replaced an ink cartridge, the LCD may ask you to verify that it was a brand new one (for example, Did You Change  Black Black). For each new cartridge you installed, press Yes to automatically reset the ink dot counter for that colour. If the ink cartridge you installed is not a brand new one, be sure to press No. |
| • | If the LCD shows No Cartridge or Cannot Detect after you install the ink cartridges, check that the ink cartridges are installed correctly. |

CAUTION
| | If ink gets in your eyes, wash them out with water at once and call a doctor if you are concerned. |
IMPORTANT
| • | DO NOT take out ink cartridges if you do not need to replace them. If you do so, it may reduce the ink quantity and the machine will not know the quantity of ink left in the cartridge. |
| • | DO NOT touch the cartridge insertion slots. If you do so, the ink may stain your skin. |
| • | If ink gets on your skin or clothing immediately wash it off with soap or detergent. |
| • | If you mix the colours by installing an ink cartridge in the wrong position, clean the print head several times after correcting the cartridge installation. |
| • | Once you open an ink cartridge, install it in the machine and use it up within six months of installation. Use unopened ink cartridges by the expiration date written on the cartridge package. |
| • | DO NOT dismantle or tamper with the ink cartridge, this can cause the ink to leak out of the cartridge. |