Scanning directly from the “Print & Fax” section

If you already added your Brother machine in the Print & Fax section, you can scan directly from there. Please follow the steps below:
1
Connect your Brother machine to the Macintosh using a USB cable. Or connect your Brother machine to the same LAN (if you are using a network model) where the Macintosh is connected.
2
Select System Preferences from the Apple Menu.
3
Click on the Print & Fax icon.
4
Select the machine from the list on the left side of the screen and click on Open Print Queue.
Screen
5
Click on the Scanner icon.
Screen
6
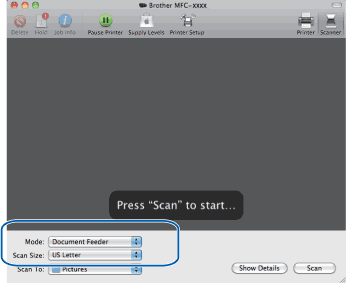
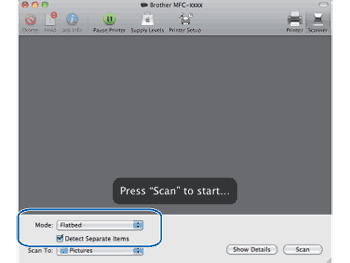
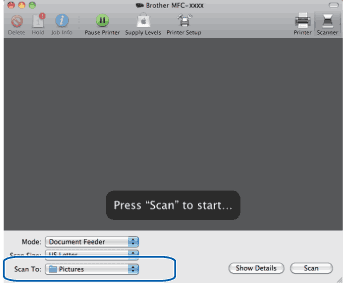
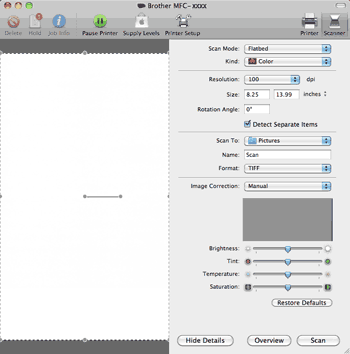
Place your document in the ADF or on the scanner glass.
If you place the document in the ADF, select “Document Feeder” for Mode and the size of your document for Scan Size.
Screen
If you place the document on the scanner glass, select “Flatbed” for Mode.
Note Note
If your Brother machine does not have an ADF, the Mode option does not appear.
When the Detect Separate Items box is unchecked, the document will be scanned as one item and saved as one file. When the Detect Separate Items box is checked, the program will detect each image and save them as separate files. If the program does not automatically crop the document as you want, you can do it manually by dragging the mouse pointer over the portion you want to scan from the dialog box that can be accessed by clicking on Show Details.
Screen
7
Select the destination folder or destination application for Scan To.
Screen
You can adjust the following settings, if needed, in the dialog box accessed by clicking on Show Details. Please note that the item name and assignable value may vary depending on the machine.
Scan Mode: Choose Document Feeder or Flatbed.
Kind: Choose from Color, Black & White or Text.
Resolution: Choose the resolution you want to scan your document at.
Scan Size: Select the paper size of the document being scanned from the Document Feeder or the scan area from the Flatbed.
Orientation or Rotation Angle: Select the orientation of the document from the Document Feeder or the angle of the scan from the flatbed.
Scan To: Choose the destination folder or destination application.
Name: Enter the prefix text used for the name of the scanned image.
Format: Select the file format of the scanned data.
Image Correction: From the manual setting you can adjust Brightness, Tint, Temperature and Saturation.
Screen
8
Click on Scan to start scanning.