CAUTION
| | Make sure that the machine has fully cooled down by leaving it disconnected from the power for at least 30 minutes before packing. |
When you transport the machine, use the packing materials that came with your machine. If you do not pack the machine correctly, you could void your warranty.
| 1 | Turn off the machine. |
| 2 | Unplug all the cables and AC power cord from the machine. |
| 3 | Press the front cover release button and open the front cover. |
| 4 | Take out the drum unit and toner cartridge assembly. Leave the toner cartridge installed in the drum unit. |
| 5 | Put the drum unit and toner cartridge assembly into a plastic bag and seal the bag. |
| 6 | Close the front cover. |
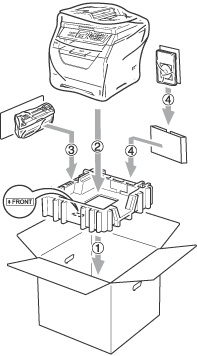
| 7 | Put the styrofoam piece marked “FRONT” into the original carton (1). Wrap the machine in the plastic bag and put it in the original carton (2). Put the drum unit and toner cartridge assembly in as shown below (3). Put the User's Guide (If available) and CD-ROM in the space at the back of the machine (4). |
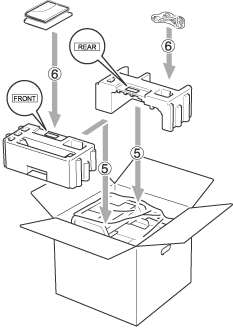
| 8 | Take the two styrofoam pieces and match the front of the machine to the “FRONT” mark on one of the styrofoam pieces, and the back of the machine to the “REAR” mark on the other styrofoam piece (5). Coil the cables and place them and the Quick Setup Guide in the spaces provided as shown below (6). |
| 9 | Close the carton and tape it shut. |