Control panel overview

Graphic
1.
LCD (liquid crystal display)
Displays messages on the screen to help you set up and use your machine.
Also, you can adjust the angle of the LCD screen by lifting it.
2.
Number of Copies
Use this key to make multiple copies.
3.
Menu keys:
Bsymbol.ltri or Bsymbol.rtri
Press to scroll backward or forward to a menu selection.
Also, press to choose options.
Bsymbol.utri or Bsymbol.dtri
Press to scroll through the menus and options.
Clear/Back
Press to go back to the previous menu level.
Menu
Lets you access the main menu to program the machine.
OK
Lets you choose a setting.
4.
Start keys:
Graphic Colour Start
Lets you start making copies in full colour. Also lets you start a scanning operation (in colour or mono, depending on the scanning setting in the ControlCenter software).
Graphic Mono Start
Lets you start making copies in monochrome. Also lets you start a scanning operation (in colour or mono, depending on the scanning setting in the ControlCenter software).
5.
Graphic Stop/Exit
Stops an operation or exits from a menu.
6.
On/Off
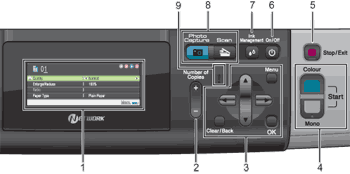
You can turn the machine on and off.
If you turn the machine off, it will still periodically clean the print head to maintain print quality. To prolong print head life, provide the best ink cartridge economy, and maintain print quality, you should keep your machine connected to the power at all times.
7.
Ink Management
Lets you clean the print head, check the print quality, and check the available ink volume.
8.
Mode keys:
Graphic Scan
Lets you access Scan mode.
Graphic Photo Capture
Lets you access PhotoCapture Center™ mode.
9.
Graphic Warning LED
Turns orange and blinks when the LCD displays an error or an important status message.

LCD display indications

The LCD display shows the mode the machine is in, the current settings, and the available ink volume.
Graphic
1.
Ink indicator
Lets you see the available ink volume.
2.
Memory Status
Lets you see the available memory in the machine.