Home > Scan > Scan Using the Scan Button on Your Machine > Scan to Network (Windows) > Set up a Scan to Network Profile > Set the Date and Time Using Web Based Management


Set the Date and Time Using Web Based Management
Make sure the date and time and the time zone settings are set correctly using Web Based Management or the control panel. The machine's time must match the time used by the server providing authentication.
- We recommend using the latest version of the following web browsers:
- Microsoft Edge, Firefox, and Google Chrome™ for Windows
- Safari, Firefox, and Google Chrome™ for Mac
- Google Chrome™ for Android™
- Safari and Google Chrome™ for iOS
- Ensure that JavaScript and Cookies are always enabled, regardless of which browser you use.
- Ignore step 1, if you already have a Web Based Management window open.
- Start your web browser.
- Type "https://machine's IP address" in your browser's address bar (where "machine's IP address" is your machine's IP address).
For example:
https://192.168.1.2
- If required, type the password in the Login field, and then click Login.
 The default password to manage this machine’s settings is located on the back of the machine and marked "Pwd".
 - Go to the navigation menu, and then click .Start from
 , if the navigation menu is not shown on the left side of the screen.
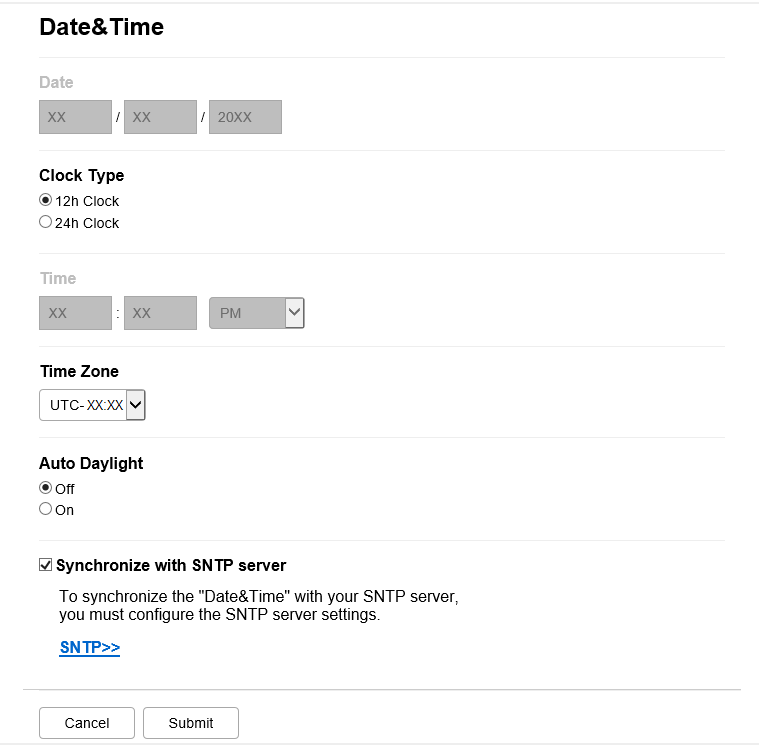
- Clear the Synchronize with SNTP server checkbox.
- In the Date fields, enter the date.
- Select the clock type from the Clock Type field.
- In the Time fields, enter the time.
- Select the time difference between your location and UTC from the Time Zone drop-down list. For example, the time zone for Eastern time in the USA and Canada is UTC-05:00.
- In the Auto Daylight field, click On to set the machine to change automatically to Daylight Saving Time. It will reset itself forward one hour in the spring, and back one hour in the autumn (available only for some countries).
- Click Submit.
Did you find the information you needed?