Home > Scan > Scan Using the Scan Button on Your Machine > Send Scanned Data to an Email Recipient
Send Scanned Data to an Email Recipient
Send scanned data directly from your machine to an email recipient without using a computer. This function allows your machine to scan documents and send them to an email address without your machine being connected to a computer. To send the scanned data as an attachment directly to your default email application using the iPrint&Scan software on your computer or the Scan button on your machine, there is the "Scan to Email Attachment" function available instead.
- To send scanned data to an email recipient, you must configure your machine to communicate with your network and email server, which is used to send and receive emails.
- You can configure these items from the machine's control panel or Web Based Management.
- To use the Scan to Email Server function, your machine will need to be connected to a network and have access to an SMTP server. You will need the following SMTP email settings before you can proceed:
Server address
Port number
User name
Encryption type (SSL or TLS)
Email server certificate (if used)
If you do not know these settings, contact your email service provider or network administrator.
- Load your document.
- Press .
- Do one of the following to enter the destination email address:
- To enter the email address manually, press [Manual], and then enter the email address using the character buttons on the LCD. When finished, press [OK].
- If the email address is stored in the machine's address book, press [Address Book], and then select the email address.
Press [OK].
- Confirm the email address, and then press [Next].
- Do one of the following:
- To change the settings, press [Options], and then select the button you want to change.

- To set your own default settings: after making changes to settings, press the [Set New Default] option, and then press [Yes].
- To restore the factory settings: press [Factory Reset], and then press [Yes].
- Press [Start] to start scanning without changing additional settings. If you are using the machine's scanner glass, follow the LCD instructions to complete the scanning job.
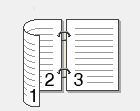
- To scan both sides of the document:
- Press [2-sided Scan], and then select the document type.
OptionDescription2-sided Scan: Long Edge 2-sided Scan: Short Edge
- Select the scan settings you want to change:
- [Resolution]
- [File Type]
- [Scan Type]
- [Document Size]
- [File Name]
- [File Name Style]
- [File Size]
- [ADF Auto Deskew]
- [Remove Background Color]
(available only for the [Color] and [Gray] options.)
- Press [Start].The machine starts scanning. If using the machine's scanner glass, follow the LCD instructions to complete the scanning job.
Did you find the information you needed?


