The High Yield toner cartridges can print approximately
2,600 pages
1 and the Standard toner cartridges can print approximately
1,500 pages
1. Actual page count will vary depending on your average type of document (i.e., standard letter, detailed graphics).
When a toner cartridge is running low, the LCD shows
Toner Low.

Note
| | It is a good idea to keep a new toner cartridge ready for use when you see the Toner Low warning. |


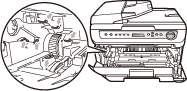
WARNING
 HOT SURFACE
| | After you have just used the machine, some internal parts of the machine will be extremely hot. To prevent injury, when you open the front or back cover (back output tray) of the machine, DO NOT touch the shaded parts shown in the illustration. |

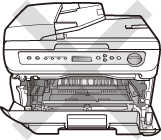
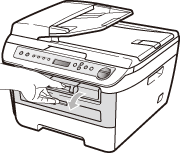
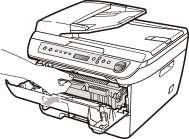
| 1 | Open the front cover. |
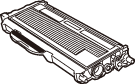
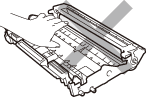
| 2 | Slowly take out the drum unit and toner cartridge assembly. CAUTION | | We recommend that you put the drum unit and toner cartridge assembly on a clean, flat surface with a piece of disposable paper or cloth underneath it in case you accidentally spill or scatter toner. | | | To prevent damage to the machine caused by static electricity, DO NOT touch the electrodes shown in the illustration. |
|
| 3 | Push down the green lock lever and take the used toner cartridge out of the drum unit. WARNING | | DO NOT put a toner cartridge into a fire. It could explode, resulting in injuries. |
CAUTION | | Handle the toner cartridge carefully. If toner scatters on your hands or clothes, wipe or wash it off with cold water at once. | | | To avoid print quality problems, DO NOT touch the shaded parts shown in the illustrations. | | | Brother machines are designed to work with toner of a particular specification and will work to a level of optimum performance when used with genuine Brother toner cartridges (TN-2110/TN-2120). Brother cannot guarantee this optimum performance if toner or toner cartridges of other specifications are used. Brother does not therefore recommend the use of cartridges other than genuine Brother cartridges with this machine, or the refilling of empty cartridges with toner from other sources. If damage is caused to the drum unit or other part of this machine as a result of the use of toner or toner cartridges other than genuine Brother products due to the incompatibility or lack of suitability of those products with this machine, any repairs required as a result may not be covered by the warranty. | | | Unpack the toner cartridge just before you put it in the machine. If a toner cartridge is left unpacked for a long time, the toner life will be shortened. |
Note | | Be sure to seal up the used toner cartridge tightly in a suitable bag so that toner powder does not spill out of the cartridge. |
|
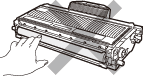
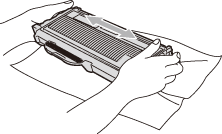
| 4 | Unpack the new toner cartridge. Hold the cartridge level with both hands and gently rock it from side to side five or six times to spread the toner evenly inside the cartridge. |
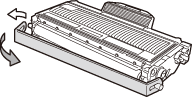
| 5 | Pull off the protective cover. |
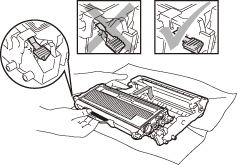
| 6 | Put the new toner cartridge firmly into the drum unit until you hear it lock into place. If you put it in correctly, the lock lever will lift automatically. CAUTION | | Make sure that you put in the toner cartridge correctly or it may separate from the drum unit. |
|
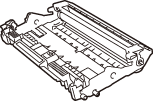
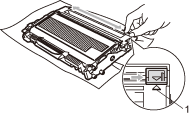
| 7 | Clean the corona wire of the drum unit by gently sliding the green tab from right to left and left to right several times. CAUTION | | Be sure to return the green tab to the home position (  ) (1). If you do not, printed pages may have a vertical stripe. |
|
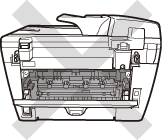
| 8 | Put the drum unit and toner cartridge assembly back in the machine. |
| 9 | Close the front cover. |
CAUTION
| | DO NOT turn off the machine’s power switch or open the front cover until the LCD returns to the standby state. |