Home > Routine Maintenance > Replace the Ink Cartridges


Replace the Ink Cartridges
Your Brother machine is equipped with an ink dot counter. The ink dot counter automatically monitors the level of ink in each of the four ink cartridges. When the machine detects that an ink cartridge is running out of ink, the machine will display a message.
The LCD displays which ink cartridge needs replacing. Be sure to follow the LCD prompts to replace the ink cartridges in the correct order.
Even though the machine tells you to replace an ink cartridge, there will be a small amount of ink left in the ink cartridge. It is necessary to keep some ink in the ink cartridge to prevent air from drying out and damaging the print head assembly.
- CAUTION
- If the ink gets into your eye, rinse it with water immediately. If left as is, it may cause redness or mild inflammation of the eye. In case of any abnormality, consult with your doctor.
- IMPORTANT
-
We recommend using genuine Brother supplies to ensure stable print quality and performance. Although not all non-genuine supplies may cause quality issues, it is possible that some may adversely affect print quality or cause machine malfunction. Brother may charge for repairing your machine if it is proven that non-genuine supplies caused the damage, even if the machine is still covered by the warranty.
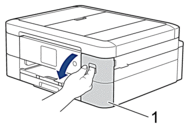
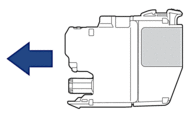
- Open the ink cartridge cover (1).
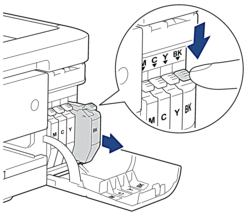
- Press the lock release lever to release the ink cartridge colour indicated on the LCD and remove the ink cartridge from the machine, as shown in the illustration.
- Open the new ink cartridge bag for the colour indicated on the LCD, and take out the ink cartridge.
- IMPORTANT
-
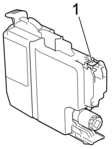
- DO NOT touch the ink cartridge in the area indicated (1); this can prevent the machine from detecting the cartridge.
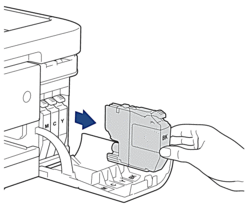
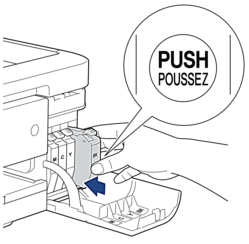
- Insert the ink cartridge in the direction of the arrow on the label.Each colour has its own correct position.
- Gently push the area marked “PUSH” until the ink cartridge locks into place, and then close the ink cartridge cover.
 The machine resets the ink dot counter.

If the machine does not detect the ink cartridge after you install it, check that the ink cartridge is installed correctly. Remove the ink cartridge and reinstall it slowly until it locks into place.
- IMPORTANT
-
- DO NOT shake the ink cartridges. If ink stains your skin or clothing, wash with soap or detergent at once.
- DO NOT remove ink cartridges if you do not need to replace them; otherwise, the machine will not know the ink quantity left in the cartridge.
- DO NOT touch the ink cartridge insertion slots; the ink may stain your skin.
- If you mix the colours by installing an ink cartridge in the wrong position, the LCD shows [Wrong Ink Colour].
Check which ink cartridges are not matched by colour to their ink cartridge positions and move them to their correct positions.
- Use unopened ink cartridges by the expiration date written on the ink cartridge package.
- DO NOT dismantle or tamper with the ink cartridge; this can cause the ink to leak out of the ink cartridge.