ControlCenter2 is a software utility that lets you quickly and easily access your often used applications. Using ControlCenter2 eliminates the need to manually launch specific applications.
There are four scan buttons for the Scan to Image, Scan to OCR, Scan to E-mail and Scan to File features.
| • | Image (Default: Apple Preview) Lets you scan a page directly into any graphic viewer/editor application. You can choose the destination application, such as Adobe® Photoshop® or any kind of image editing application on your computer. |
| • | OCR (Default: Apple TextEdit) Lets you scan a page or document, automatically run the OCR application and put text (not a graphic image) into a word processing application. You can choose the target word processing application, such as Microsoft ® Word or any word processing application on your computer. You must install Presto! PageManager on your computer. For installation information see Scan Using Presto! PageManager or TWAIN Applications (Macintosh). |
| • | E-mail (Default: your default E-mail software) Lets you scan a page or document directly into an E-mail application as a standard attachment. You can choose the file type and resolution for the attachment. |
| • | File Lets you scan directly to a disk file. You can change the file type and destination folder, as needed. |
ControlCenter2 gives you the ability to configure the hardware to PC button on your machine and the ControlCenter2 software button for each scan feature. To configure the hardware to PC button on your machine choose the Device Button tab in the configuration menu for each of the SCAN buttons. To configure the software button in ControlCenter2 choose the Software Button tab in the configuration menu for each of the SCAN buttons.
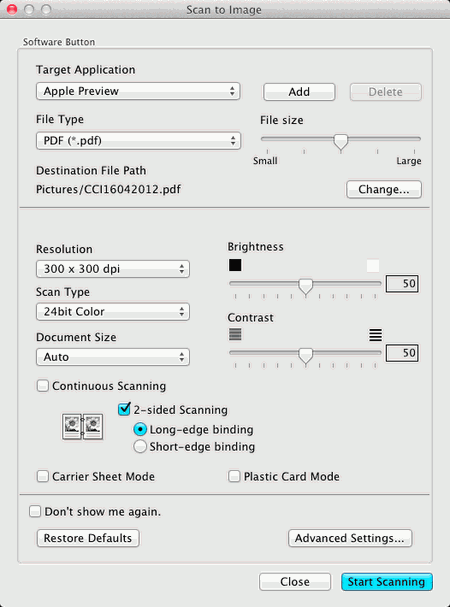
Image (example: Apple Preview)
The Scan to Image feature lets you scan an image directly into your graphics application for image editing.
| 1 | Select the SCAN tab. |
| 2 | Click  ( Image). The Scan to Image dialog box will appear. |
| 3 | You can configure the scan settings. | • | To scan a 2-sided document, check the 2-sided Scanning check box and choose Long-edge binding or Short-edge binding. | | • | To change the application that you want to use, choose the appropriate application from the Target Application pop-up menu. You can add an application to the list by clicking Add. If you want to delete an application, click Delete. |
|
| 4 | Click Start Scanning. Your default application will start and display the image. |

Note
| | If you choose Secure PDF (*.pdf) from the File Type list, the Set PDF Password dialog box will appear. Enter your password in the Password and Re-type Password boxes, and then click OK. You can also choose Secure PDF (*.pdf) for Scan to E-mail and Scan to File. |