Firewall settings on your computer may reject the necessary network connection for network scanning. If you are using Windows® Firewall and you installed MFL-Pro Suite from the DVD-ROM, the necessary Firewall settings have already been made. If you did not install from the DVD-ROM follow the instructions below to configure Windows® Firewall. If you are using any other personal firewall software, see the user’s guide for your software or contact the software manufacturer.
UDP Port number information for Firewall configuration
UDP Port | Network Scanning |
External Port number | |
Internal Port number | |
Windows® XP SP2 or Later Users
| 1 | Click Start, Control Panel, Network and Internet Connections and then Windows Firewall. Make sure that Windows Firewall on the General tab is set to On. |
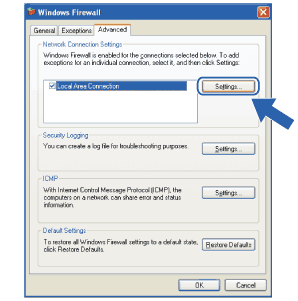
| 2 | Choose the Advanced tab and click Settings. |
| 3 | Click Add. |
| 4 | Add port 54925 for network scanning by entering the information below: | 1. | In Description of service: Enter any description, for example “Brother Scanner”. | | 2. | In Name or IP address (for example 192.168.0.12) of the computer hosting this service on your network: Enter “Localhost”. | | 3. | In External Port number for this service: Enter “54925”. | | 4. | In Internal Port number for this service: Enter “54925”. | | 5. | Make sure UDP is selected. | | 6. | Click OK. |
|
| 5 | If you still have trouble with your network connection, click Add. |
| 6 | Add port 137 for network scanning by entering the information below: | 1. | In Description of service: Enter any description, for example “Brother Network Scan”. | | 2. | In Name or IP address (for example 192.168.0.12) of the computer hosting this service on your network: Enter “Localhost”. | | 3. | In External Port number for this service: Enter “137”. | | 4. | In Internal Port number for this service: Enter “137”. | | 5. | Make sure UDP is selected. | | 6. | Click OK. |
|
| 7 | Make sure that the new setting is added and is checked, and then click OK. |