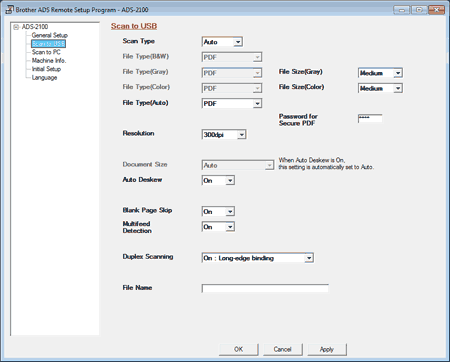
Scan Type | Lets you select from a range of scan colour depths. | • | B&W Use for text or line art images. | | • | Grey Use for photographic images or graphics. | | • | Colour Uses up to 16.8 million colours to scan the image. Although using 24bit Colour creates an image with the most accurate colour reproduction, it requires the most memory and has the longest transfer time. | | • | Auto Uses suitable colours for your document automatically. |
|
File Type(B&W) | Lets you select a file type for scanning in black & white.
Select a file type you want to use for the scanned data.  Note | | To save the document as a password-protected PDF, select Secure PDF from the File Type(B&W) drop-down list, enter the password (the default value is “0000”) in the Password for Secure PDF field. |
|
File Type(Gray) | Lets you select a file type for scanning in grey.
Select a file type you want to use for the scanned data. Note | | To save the document as a password-protected PDF, select Secure PDF from the File Type(Gray) drop-down list, enter the password (the default value is “0000”) in the Password for Secure PDF field. |
|
File Type(Color) | Lets you select a file type for scanning in colour.
Select a file type you want to use for the scanned data. Note | | To save the document as a password-protected PDF, select Secure PDF from the File Type(Color) drop-down list, enter the password (the default value is “0000”) in the Password for Secure PDF field. |
|
File Type(Auto) | Lets you select a file type when you have selected Auto from the Scan Type drop-down list. Select a file type you want to use for the scanned data. Note | | To save the document as a password-protected PDF, select Secure PDF from the File Type(Auto) drop-down list, enter the password (the default value is “0000”) in the Password for Secure PDF field. |
|
Resolution | You can select a scanning resolution from the Resolution drop-down list. Higher resolutions take more memory and transfer time, but produce a finer scanned image. |
Document Size | Lets you choose from a selection of preset scan sizes. |
Auto Deskew | Corrects the skew (within 5 degrees) of the scanned data. |
Blank Page Skip | Removes any blank pages within the document from the scanning results. |
Multifeed Detection | Detects a multifeed of the document by ultrasonic sensor. When this function detects multifeed, confirm that the data scanned before the multifeed is saved, and start scanning again from the next page or from the beginning. Note | | The data scanned before the multifeed occurred is saved if you have selected JPEG as the file type. |
|
Duplex Scanning | If you select On : Long-edge binding or On : Short-edge binding, the machine scans both sides of the document. You must select On : Long-edge binding or On : Short-edge binding depending on the layout of your document to make sure that the data file is created correctly. |
File Name | Enter a prefix for the file name (up to 64 characters). The file name will be the prefix you registered and a sequential number. If the prefix is not entered, the file name will be the date and a sequential number. |
File Size(Gray) | Lets you select a file size for scanning in grey.
Select a file size you want to use for the scanned data. |
File Size(Color) | Lets you select a file size for scanning in colour.
Select a file size you want to use for the scanned data. |
Password for Secure PDF | Enter a 4-digit PIN number. |