Scan to PDF

You can scan and save documents as PDF files.
1
Load your document.
2
Click the Graphic (ControlCenter2) icon in the menu bar and then select Open.
The ControlCenter2 window will appear.
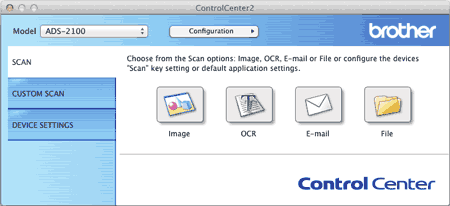
Screen
Note Note
If the Graphic (ControlCenter2) icon is not displayed in the menu bar, double-click the ControlCenter icon.
The ControlCenter icon is in Macintosh HD/Applications/Brother.
The Graphic (ControlCenter2) icon will appear in the menu bar.
3
Click the Image button in the SCAN tab while holding down the Control key.
The settings dialog box will appear.
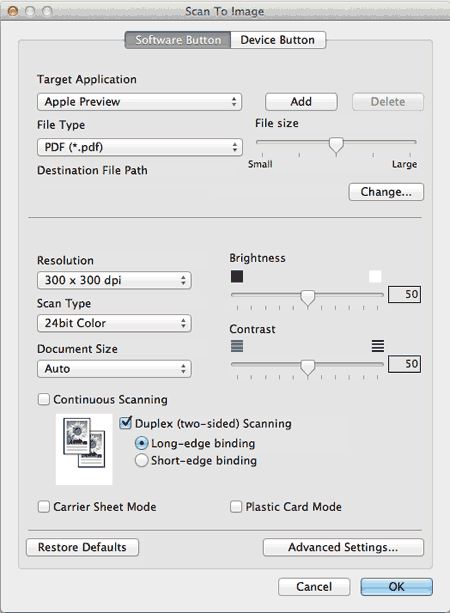
Screen
4
Select PDF (*.pdf) from the File Type drop-down list.
Note Note
To save the document as a password-protected PDF, select Secure PDF (*.pdf) for File Type and then enter the password in the Set PDF Password dialog box.
Searchable PDF is a file format that includes the text data layer over a scanned image. This layer allows you to search the text on the image data. The OCR language setting must be set to match the language you want to make the searchable PDF for.
To save the document as a searchable PDF, select Searchable PDF (*.pdf) from the File Type drop-down list.
To save the document as a searchable PDF, Presto! PageManager must be installed from the supplied DVD-ROM on your computer.
Searchable PDF (*.pdf) is available for English, French, German, Dutch, Italian, Spanish, Brazilian Portuguese, Danish, Swedish, Japanese, Traditional Chinese, Simplified Chinese and Korean.
You can change the OCR Language with the OCR Language drop-down list in the setting dialog box for the Scan to OCR action.
Several file types such as TIFF, TIFF Multi-Page, PDF and JPEG support file size compression. Select Uncompressed or Compressed to adjust the file size for TIFF or TIFF Multi-Page. For JPEG and PDF use the slider to adjust the file size.
5
Change other settings if needed (see Change Scan Settings).
6
Click the Image button in the SCAN tab.
The message dialog appears. Click the Start Scanning button.
The machine starts scanning.
Note Note
Check the Don’t show me again. check box to not show the message dialog again.
The application selected in Target Application starts and the PDF file of the scanned document is displayed.