Direct PC Connection Using USB Cable (Windows Only)
With a USB cable, directly connect the machine and the computer with DesignNCut Manager (DesignNCut application for operation options).
If you have already selected the connection method, please go to step 4.
 : Operation performed in DesignNCut Manager
1.Click [Start Setup].
2.Click [Connect].
3.Select [USB Cable], and then click [Next].
 : Operation performed on the machine
4.Plug the USB cable connectors into the corresponding USB ports on the computer and on the machine.
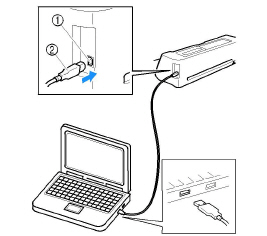
(1)USB port for a computer
(2)USB cable

•USB Cable is sold separately.
•This connection is for Windows PC only and not available for Mac computers.
5.Turn off the DesignNCut machine, by pressing  .
.
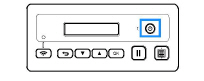
6.Press  and the
  at the same time, once the power comes on release
  while still pressing down
  .
.
7.When the message [Machine mode?] appears on your LCD, press  to select [USB].
8.The message, [Turn the machine off, then on again.] will appear on your LCD.
Follow the machine's instruction.
Once your machine is back on, the text [Standby (USB)] should display on your LCD.
 : Operation performed in DesignNCut Manager
9.Go back to DesignNCut Manager and click [Connect].
10.When [DesignNCut connection is successful.] appears in the dialog box, click [OK].
11.Click [ScanNCutCanvas] to access to
http://ScanNCutCanvas.Brother.com to register a new account.
12.After registering, click [Next].
>All settings have been completed.
Click [How to Use] on the DesignNCut Manager to see tutorial for the basic usage.
13.Click [Close].

•When connecting the machine and computer with a USB cable, the AutoPlay dialog box may appear repeatedly. To not display the dialog box, change the AutoPlay settings as described below.
-Windows 7
Click  > [
> [
-Windows 8.1
Move your mouse to the lower right corner of your desktop. When the menu bar appears, click [
-Windows 10
Click  > [
> [