Home > Appendix > Optional Accessories > Linerless Platen Upgrade (Optional: PA-LPR-004) > Install the Linerless Platen Upgrade
Install the Linerless Platen Upgrade
This printer is compatible with linerless media.
Parts Description
Linerless Platen Assembly  | Screws (2) |
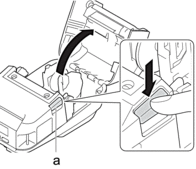
- Push the Roll Cover Release Lever to open the Roll Compartment Cover.

- Roll Cover Release Lever
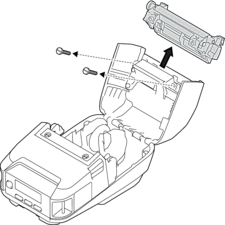
- Remove the standard platen by removing the two screws shown in the illustration.

- CAUTION
- Do not touch the blade when removing the standard platen.
 Recommended tightening torque: 4.87±0.434 in·lbs (0.55±0.049 N·m).
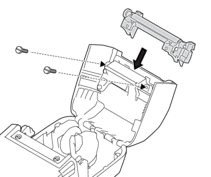
 - Install the Linerless Platen Assembly, and fasten it using the two screws included in the Linerless Platen Upgrade.

 The lower tear bar cannot be used when the Linerless Platen Upgrade is installed.
 - Set Linerless to On in the Advanced tab of the Printer Setting Tool.
- NOTE
-
- When Linerless is set to On, [Tear Bar] in [Settings] and [Auto Detect] in [Media] cannot be selected on the printer's LCD.
- For best performance, make sure the paper's head margin is at least 0.47" (12 mm).
- When using the Linerless Platen Upgrade, paper dust may stick to the print head. Clean the print head regularly. For more information, see Related Topics:
- Use the latest firmware when printing with the Linerless Platen Upgrade.
Did you find the information you needed?


